
Table of Contents
- What is a Plank?
- What Muscles Are Used in a Plank?
- Plank Progressions
- Step 1: Wall-Assisted Plank
- Step 2: Kneeling Plank
- Step 3: Kneeling Side Plank
- Step 4: Straight-Arm Plank
- Step 5: Plank (Benchmark Skill)
- Step 6: Side Plank
- Step 7: One-Legged Plank
- Step 8: One-Legged, One-Armed Plank
- Step 9: One Legged, One-Armed Side Plank
- Step 10: Wall Plank
- Step 11: Wall Plank March (Hallmark Skill)
- Step X: Beyond the Wall Plank March
- Ending Thoughts
What is a Plank?
The Plank is an isometric core exercise that strengthens all the muscles of your torso. Perform the exercise by getting down on the floor in push-up position, feet together. Place your forearms on the ground comfortably, and drive the energy of your elbows down and back towards your abs. Stay in position for as long as possible, feeling the exercise in your abs.
What Muscles Are Used in a Plank?
Most people do planks as a solo ab exercise for one reason: it creates impressive strength and creates beautiful abs. The plank creates tension in your entire body, especially around the abs and obliques. Planks can replace crunches and sit-ups (curl-ups) entirely, as planks are a more effective, efficient, and impressive exercise. Like Hanging Leg Raises, they create flexible armor around your midsection. Stronger abs means stronger body, period. All kinetic energy transitions through the abs in some way. They are also useful for absorbing punches, or just showing off a flat stomach/six-pack (after fat loss).
Plank Progressions
As outlined in GainTrain’s Workout Guide, you progress by completing increasingly more challenging variants of an exercise. Below are the progressions for the plank. Find what step you are currently at by attempting a few reps. If you can do the exercise easily (you can hold position for 30 seconds straight, no problem), try the next. Continue until you find a variant that you cannot hold for 30 seconds. That is your starting point.
Each workout, strive to hit 60 seconds of planking. If you can’t nail it all in one go, take a 10-20 second break, then do some more.
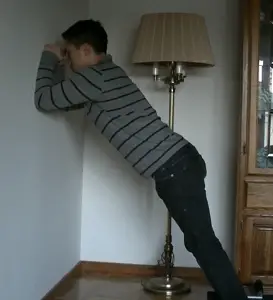
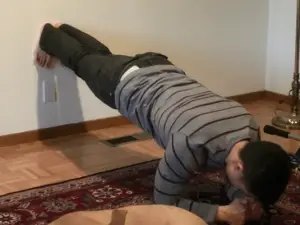
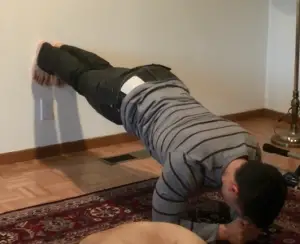
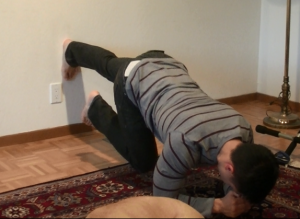
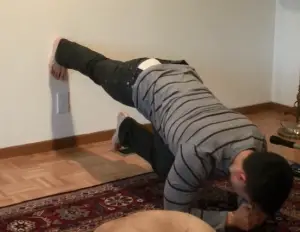
Step 1: Wall-Assisted Plank
To do a wall-assisted plank, place your forearms in the shape of an upside-down V onto the wall. Your hands should be touching each other and elbows should feel like they are in a natural position.
Lean into the wall, directing as much of the tension into your abs as possible. Take steps back to gradually make this exercise harder until you are at the position shown below.
To perform the exercise, hold the position. Every second held is a “rep” towards the final goal of 60 seconds. When you can hit 60 seconds without changing position, move onto the next exercise.
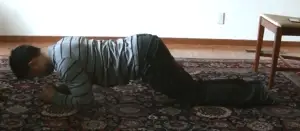
Step 2: Kneeling Plank
Same position as the above, but now you’re on the floor. Get into the position below, keeping your back as straight as possible. Hold the position.
Once you can hold this position for 60 seconds straight, go to the next step.
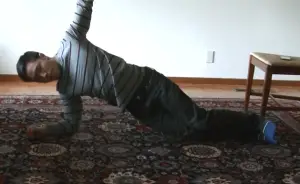
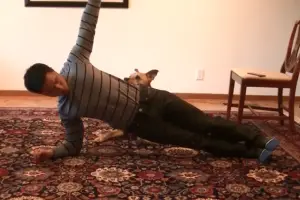
Step 3: Kneeling Side Plank
Get into the Kneeling Plank position, then roll your body onto your knees and legs. Raise one arm until it is extended overhead. Hold this position. You should feel more tension in your obliques (the “side abs”).
After 30 seconds, switch to the other side. Once you can hold this position for 60 seconds straight, go to the next step.
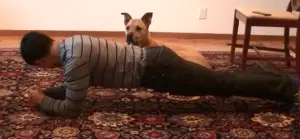
Step 4: Straight-Arm Plank
Instead of elbows on the floor, place your hands on the floor. This is the same position as a push-up! I recommend bringing your hands in as close as possible to make it harder. Now just hold for 60 seconds. Once you can hold this position for 60 seconds straight, go to the next step.

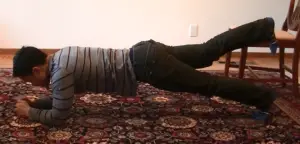
Step 5: Plank (Benchmark Skill)
Here is the traditional Plank! To perform a Plank, get into Push-up position. Then place your forearms on the floor, shaped like an upside-down V. Your hands should be touching each other and elbows should feel like they are in a natural position. Hold this position.
Once you can hold this position for 60 seconds straight, go to the next step.
Step 6: Side Plank
From Plank position, shift your body so you are sideways. Raise one arm overhead. You’ll feel this in the obliques.
Once you can hold this position for 60 seconds straight, go to the next step.
Step 7: One-Legged Plank
Get into Plank position, then lift up a leg. It doesn’t need to be high, just off the floor. This will decrease stability with the floor, forcing your abs to work harder.
Once you can hold this position for 60 seconds straight, go to the next step.
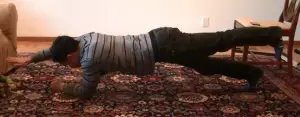
Step 8: One-Legged, One-Armed Plank
Get into One-Legged Plank position. After lifting your leg, lift and extend your opposite arm. If your left leg is lifted, extend your right arm. If your right leg is lifted, extend your left arm. This further decreases stability and forces your abs to work overtime.
After holding this position for 30 seconds, switch to using your other leg and arm. Once you can hold both positions back-to-back for 60 seconds (30 seconds each), go to the next step.
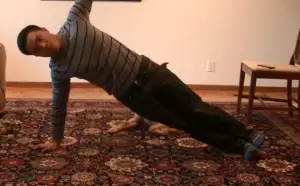
Step 9: One Legged, One-Armed Side Plank
Side Plank position, but with a straight arm.
Once you can hold this position for 60 seconds straight, go to the next step.
Step 10: Wall Plank
There’s a bit of technique involved here. First, find a suitable wall and take off your socks (unless wearing shoes). Socks will make it too slippery to plant your feet. Now, get into Plank position with your heels touching the baseboard of your wall. Raise one leg a little above torso height, and plant foot firmly on the wall. Scoot your body towards the wall a few inches, keeping tension in your forearms. Lift and plant your other leg.
Once you can hold this position for 60 seconds straight, go to the next step.
Step 11: Wall Plank March (Hallmark Skill)
This one requires a bit of balance, and a lot of core strength! Get into Wall Plank position. Now mimic a “marching” motion. Move one knee towards your chest, then hold for 5 seconds. Place your foot back on the wall, and hold another 5 seconds. Then bring your other knee towards your chest, and hold for 5 seconds. That’s 12 “5 second holds” so you can easily remember!
Once you can hold this position for 60 seconds straight, you’re a venerable plank master! I’ll talk about increasing difficulty below.
At this point, you’re in damn good shape and have an iron-clad, movement-ready core. If you are following the GainTrain Workout and have mastered both Planks and Hanging Leg Raises (aka, 4×8’ing or 60sec’ing both), you now have the muscular base to start showing off abs. If not, it’s time to begin a cut (a fat loss focus mode) by changing up your diet. Continue the GainTrain Workout as you reduce non-protein calories to maintain muscle mass/strength and lose fat. You’ll have a six-pack in no time.
Step X: Beyond the Wall Plank March
Once you can hit 60secs without rest on a Wall Plank March, you’ll have some options to increase Plank difficulty:
- Weighted Planks – Place a backpack, books, or a person on your back while in normal Plank position. You’ll never run out of weight, so the exercise will always be more challenging! Impress your (future) significant others by planking with them on top of you!
- For-Time Wall Plank March – Double-time your Wall Plank Marches to maintain the strength you have and increase muscular endurance. For boxers, wrestlers, and other high-rep movement sports, you’ll likely find it more athletically beneficial to increase muscular endurance at this point.
Ending Thoughts
I love planks! For people who are “ab blind” and have difficulty feeling how to activate their abs,planks help immensely. They are the supreme core exercise, perhaps in tandem with Hanging Leg Raises, in terms of low technical barrier to entry, equipment-free nature, and bang-for-your-buck workout efficiency. Add planks to your GainTrain routine or as an accessory exercise to your own lifting routine for improved strength all-around.
I hope this tutorial was helpful in understanding and progressing on Planks! Any questions, let me know in the comments below.
3 replies on “The Plank – Tutorials and Progressions”
I am currently doing the one legged Plank for 60 sec, and dont feel any strain in my abs/torso, but my legs can barely keep up. However I can currently do 4×4 ea. assisted pistol squads, so I dont think my legs should be that weak. Should I keep doing the one legged Plank, till my legs can easily keep up, or am I doing something wrong?
Hey Joyeuse,
Typically if you aren’t feeling non-muscular pain (for example, sharp nerve-like pain), then you can keep training it. These plank variants weren’t chosen just to cultivate abs — they are to discover potential areas of weakness. Usually when legs collapse from single-leg planks, it is a lack of posterior chain stability, specifically on the hamstrings. That’s my general guess, but I have a couple extra questions…
1) Which part of your leg begins to get sore (for example, is it the back of your knee, the back of your upper leg, the back of your lower leg?)
2) In your assisted pistol squats, are you going down slowly and relatively controlled? Any non-muscular pain? What are your weak points in the squat?
I feel like its mostly the front of my upper leg, that is struggling. Depending on the Day I sometimes also feel some light Pain in the hip, but it usually disappears after shifting my weight a bit.
I think I go down relatively controlled, but I am not sure, how long should it optimaly take? As for my weak points, I would say I struggle the most with going up, especially on the later reps.