
As outlined in Roam Strong’s workout program, you progress by completing increasingly more challenging variants of an exercise. Below are the progressions of the Push-up.
Table of Contents
- What is a Push-up?
- What Muscles Are Used in a Push-up?
- Why Should I Push-up? Benefits of Push-Ups
- Push-up Technique
- Push-up Progressions
- Step 1: Wall Push-up
- Step 2: High Incline Push-up
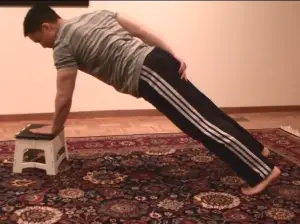
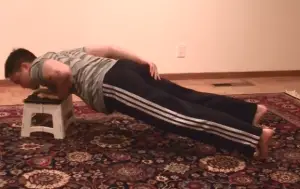
- Step 3: Low Incline Push-up
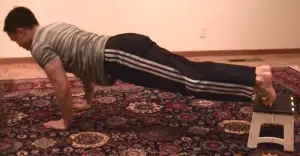
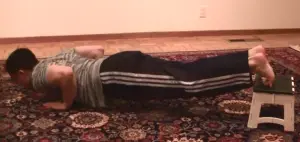
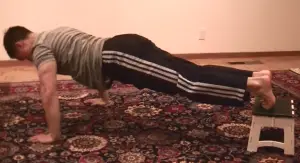
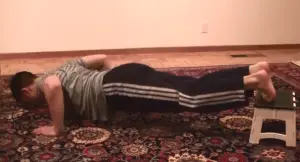
- Step 4: Push-up (Benchmark Skill)
- Step 5: Close Push-up/Diamond Push-up
- Step 6: Wide Push-up
- Step 7: Low Decline Push-up
- Step 8: Low Decline Close Push-up
- Step 9: Low Decline Wide Push-up
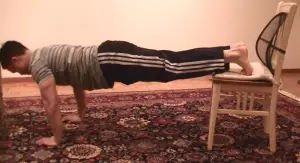
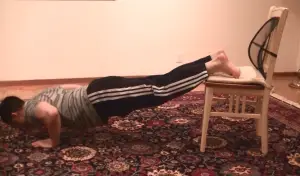
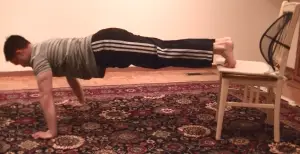
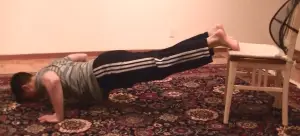
- Step 10: High Decline Push-up
- Step 11: High Decline Close Push-up
- Step 12: High Decline Wide Push-up
- Step 13: Wall One-Armed Push-up
- Step 14: High Incline One-Armed Push-up
- Step 15: Low Incline One-Armed Push-up
- Step 16: One-Armed Push-up (Hallmark Skill)
- Step X: Beyond One-Armed Push-ups
- Common Push-up Mistakes
- Ending Thoughts
(For Step 1 through 13. See Table of Contents for the rest)
(For Step 16: One-Armed Push-up example)
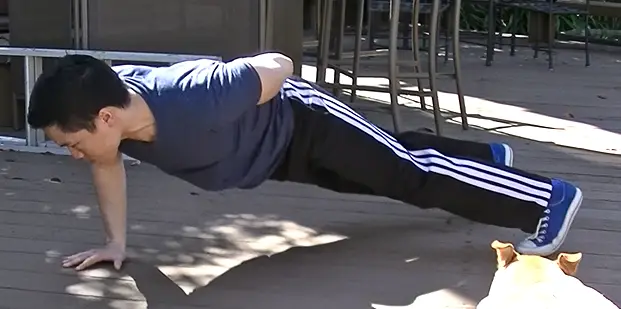
Mastering the push-up is one of the wisest fitness decisions that you will ever make. An essential exercise to nearly every program, the humble push-up can improve upper body strength, strengthen your core, shred fat, and discover muscular imbalances. It engages nearly every muscle in your body, making it one of the best bang-for-your-time exercises. Best of all, you can do them anywhere! You need only enough space for your body and firm ground.
This article will teach you how to correctly do a push-up with proper technique, and include ways to progress up to it, and beyond it.
What is a Push-up?
Push-ups are a horizontal pushing exercise. They improve a person’s ability to direct energy away from them, as in a punch or pushing with both arms forward. They also train the ability to absorb impact as you fall onto your arms.
What Muscles Are Used in a Push-up?
The primary muscles used in a push-up are the chest, triceps, and front shoulder muscles. Other affected muscles are the abs, lower back, and upper back (for stabilization).
Why Should I Push-up? Benefits of Push-Ups
I consider push-ups the keystone of all exercise. They are simple to learn, and there are ways to make them much harder once you can do them easily.
If you do just two exercises, the Push-up and the Squat are my recommendations because there are no excuses to not do them and they cover a wide breadth of muscle and movement. They build a fitness habit like no other.
Here are practical reasons why I love push-ups:
- Works your entire upper body: This hits every muscle in your chest, triceps, shoulders, biceps (sorta), upper/middle/lower back (for stability on the eccentric portion), and core (for stability).
- Better than benching: Bench Press is the big lift for horizontal pushing and chest/tricep work. A lot of people injure their shoulders and elbows due to overzealous ambitions. Push-ups are inherently safer as a closed-chain knietic exercise, even if you stack weight up on yourself. So, you get the same benefits, in a more functional form (about halfway down the page), that you can do anywhere! I’ve entirely replaced benching in my routine in favor of push-ups and dips.
- Habit forming: I am addicted to push-ups. Watching TV? Do a set of push-ups! Waiting for soup to boil? Push-ups! Perhaps too many TV/cartoon shows had me believing I could be superhumanly strong by throwing in these mini-sets, but one thing is for sure – they helped me build the fitness habit, kept me active when I wasn’t working out, and made the process fun.
- No equipment = no excuses: This applies to all of the exercises in the GainTrain Workout, but being independent of equipment means people stick to it and start to enjoy it.
Push-up Technique
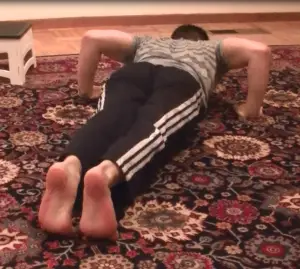
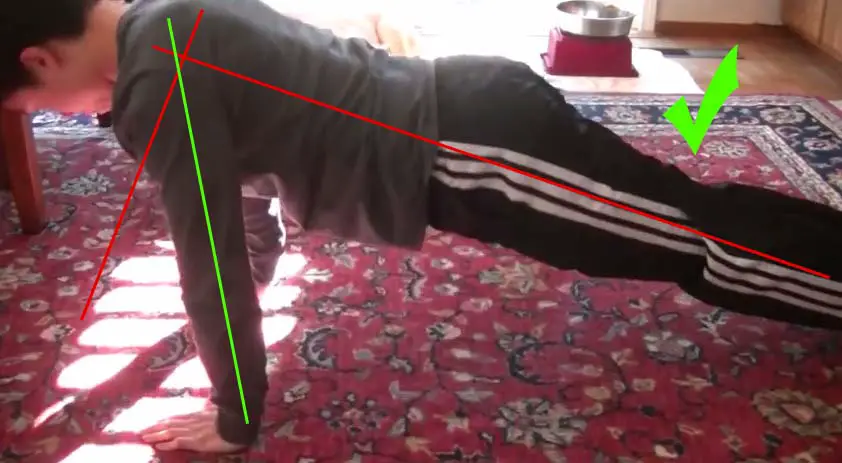
To do a push-up, get into a face-down prone position. Keep your feet together. Place your hands near your shoulders, elbows pointed out and back at 45 degrees. Your middle fingers and elbows should be in the same line to prevent wrist strain and maintain a stronger line of energy from arm-to-floor.

From here, push your bodyweight off the ground using your arms and chest. Specifically, you’re pushing with your triceps, your chest, and your shoulders. Try to focus the pushing through the arms. Keep your lower back, abs, and butt just engaged enough to keep your body stable. Imagine your body is a straight line when pushing up to get the proper feeling!

From here, just go back down, then push back up. Here are some other helpful cues for push-ups in the 1-8 rep rage:
- Stance: Hands on the floor in a line, feet together
- Toes: Both feet touching each other
- Knees: Straight and stable. Your knees do not bend during any push-up variant
- Head: Whatever is in line with your spine. Looking about 45 degrees in front of you works best. Avoid tilting your head up or down too far.
- Breath: Inhale as you descend from the starting position. Hold your breath at the bottom. Push-up as you continue to hold your breath. Exhale when you reach the top. Feel free to pause at the top to inhale and exhale before continuing with the set.
For 8+ reps, you may want more aerobic capacity. In that case, your breathing should be inhaling on descent, and exhaling when pushing up.
Push-up Progressions
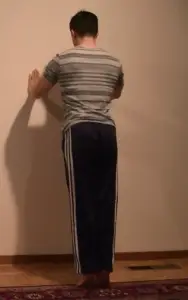
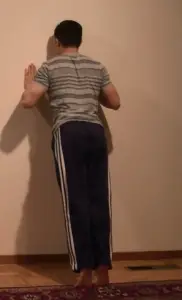
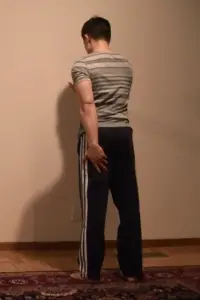
Step 1: Wall Push-up
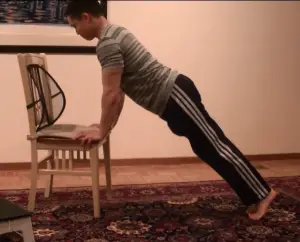
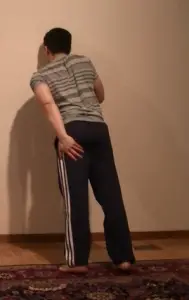
Step 2: High Incline Push-up

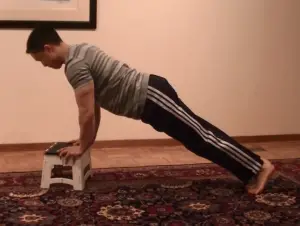
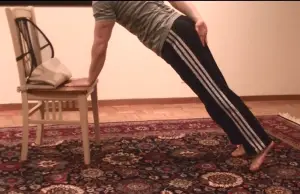
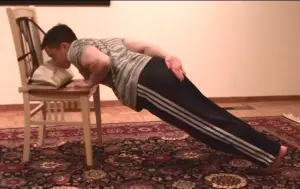
Step 3: Low Incline Push-up
Step 4: Push-up (Benchmark Skill)
Step 5: Close Push-up/Diamond Push-up
Step 6: Wide Push-up
Step 7: Low Decline Push-up
Step 8: Low Decline Close Push-up
Forgot pics! Imagine the Low Decline Push-up, but with the diamond “^ “hand position.
Step 9: Low Decline Wide Push-up
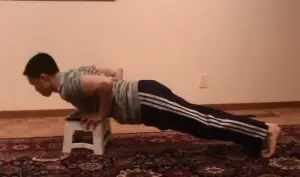
Step 10: High Decline Push-up
Step 11: High Decline Close Push-up
I just keep forgetting the Close Push-up variants. I’ll try to take some photos some day.
Step 12: High Decline Wide Push-up
Step 13: Wall One-Armed Push-up
Step 14: High Incline One-Armed Push-up
Step 15: Low Incline One-Armed Push-up
Step 16: One-Armed Push-up (Hallmark Skill)
Ah, the hallmark One-Armed Push-up. Made famous by the likes of Jack LaLanne and Rocky Balboa, the One-Armed Push-up is a testament to raw and technical power. Let’s get started on accomplishing this feat of strength.
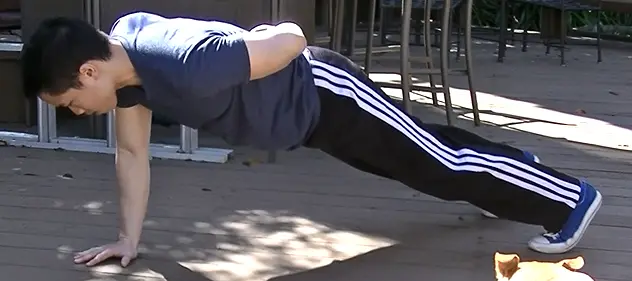

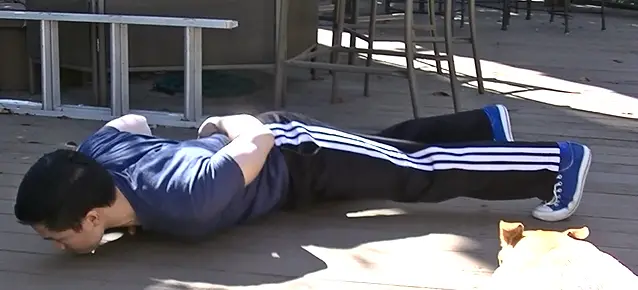

Because I love the one-armed push-up so much, I’ve included a video for your viewing pleasure. This will show you how it looks in motion. Once you can nail 4×8 One-Armed Push-ups, congratulations! This skill is pretty highly coveted and requires a combination of pressing strength, balance, coordination, and coolness.
Step X: Beyond One-Armed Push-ups
After you can nail 4×8 One-Armed Push-ups, you have a few options to consider depending on your goals:
- High Reps: If you want to build up your muscular endurance, continue training with One-Armed Push-ups and normal Push-ups for repetitions. Try to blast out 4 sets of 20+! The challenge never ends, and you will maintain the muscles in your arms and chest. This doubles as a sweet bragging right!
- Weighted Push-ups: If you have a backpack, weights, or a person to sit on your back, you can make two-handed push-ups more challenging by adding weight. There is no greater feeling that slamming out a set of 10 push-ups with a friend on your back. (A bonus tip for weightlifters: this is a great option if you’ve injured your shoulder on the bench. Push-ups are much more forgiving on impingement due to the closed kinetic chain nature of the exercise)
- Weights: the natural analogy to this movement is the Bench Press, the favorite among those who lift weights. Bench Pressing is one method to continue developing your horizontal pressing strength via chest and triceps.
Common Push-up Mistakes
Push-up mistakes are more common than I would like. I’ve seen some awful, and downright silly push-up forms. Here’s a list of things to avoid:
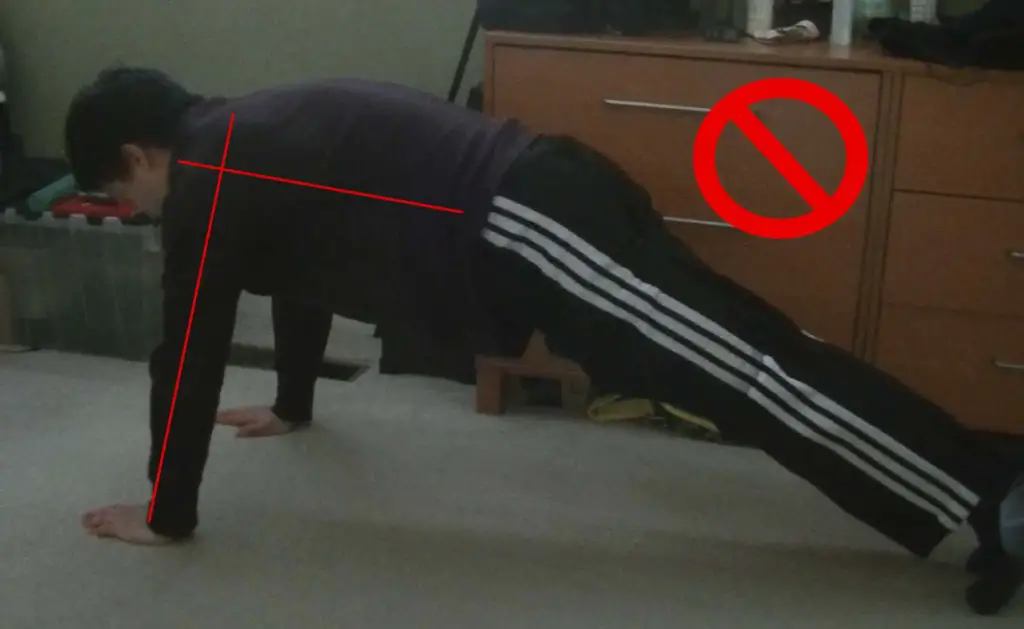
1. Staring Ahead
This doesn’t quite change the push-up, but it can lead to neck strain. It’s much better to keep your head in a neutral position! I admit that I am guilty of looking dead forward on habit. Don’t be me. Be better than me.
2. “Crucifix Push-ups”
Pretend you are shaped like a T. Now rotate your arms in front of you. That’s the position you should not be doing. For the untrained, this is bad for your shoulders and other joints. Instead, you’ll want to drop your arms slightly below your shoulders. Note that there is a “Crucifix Push-up” exercise that essentially has you pushing up with just your shoulders… that is far beyond this push-up tutorial. Maybe some day, I’ll post about it here!
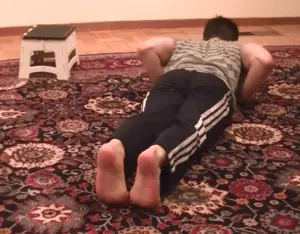
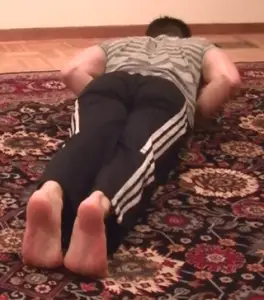
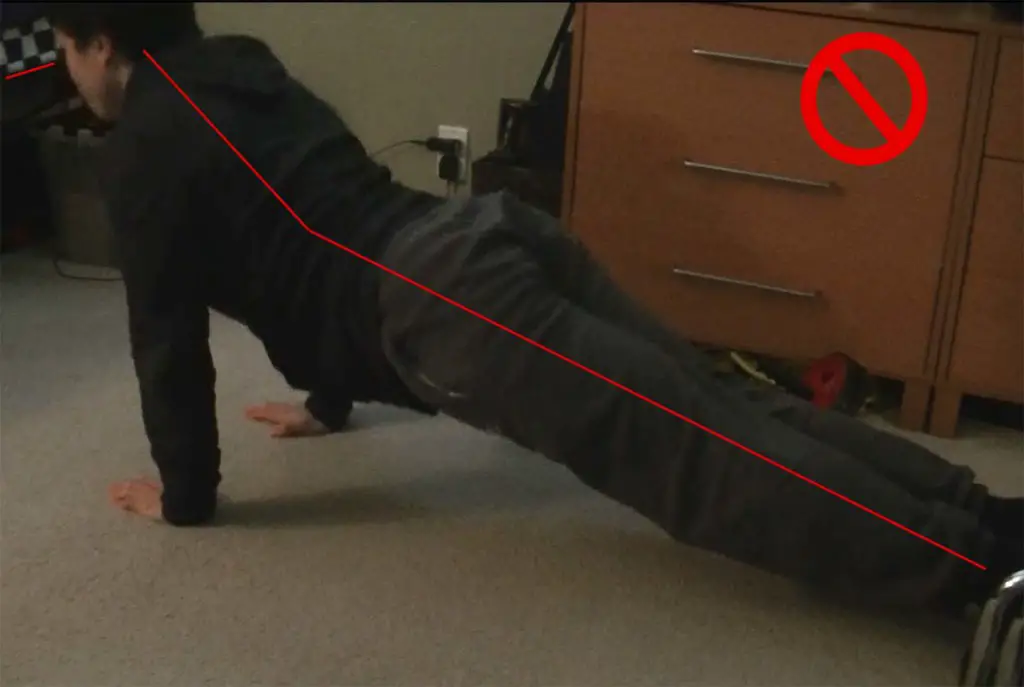
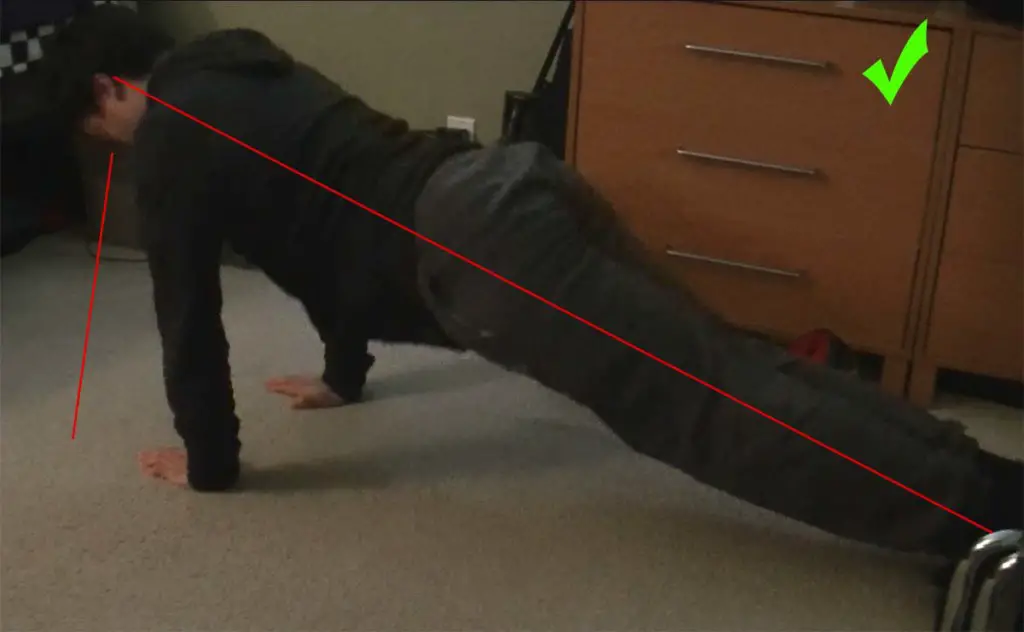
3. Hunching Your Back
There are two offenses here. One is caving in too far, as you saw in the first mistake:
And one is caving out too far:
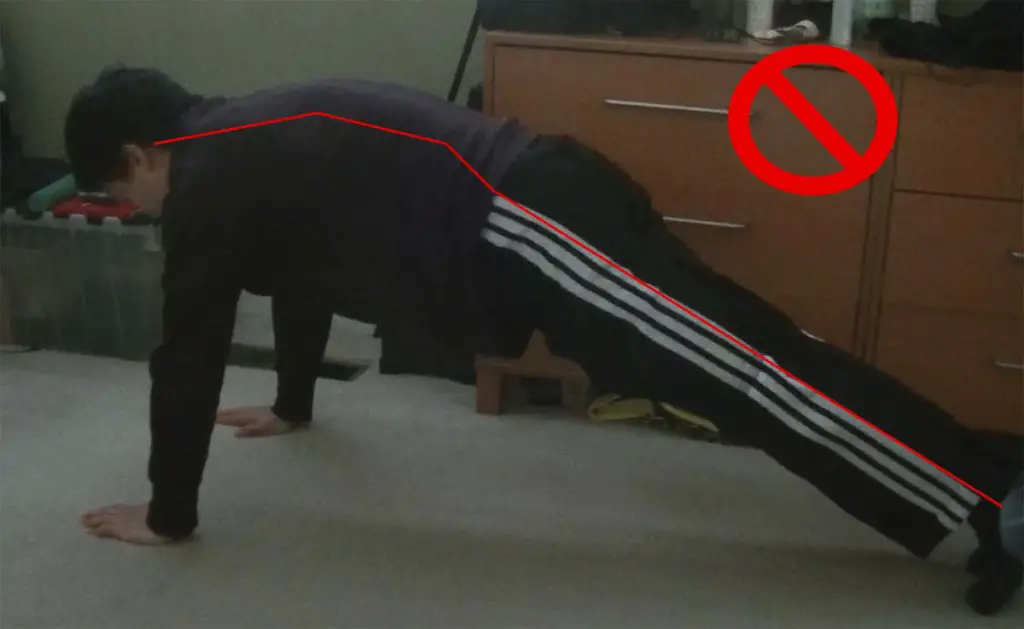
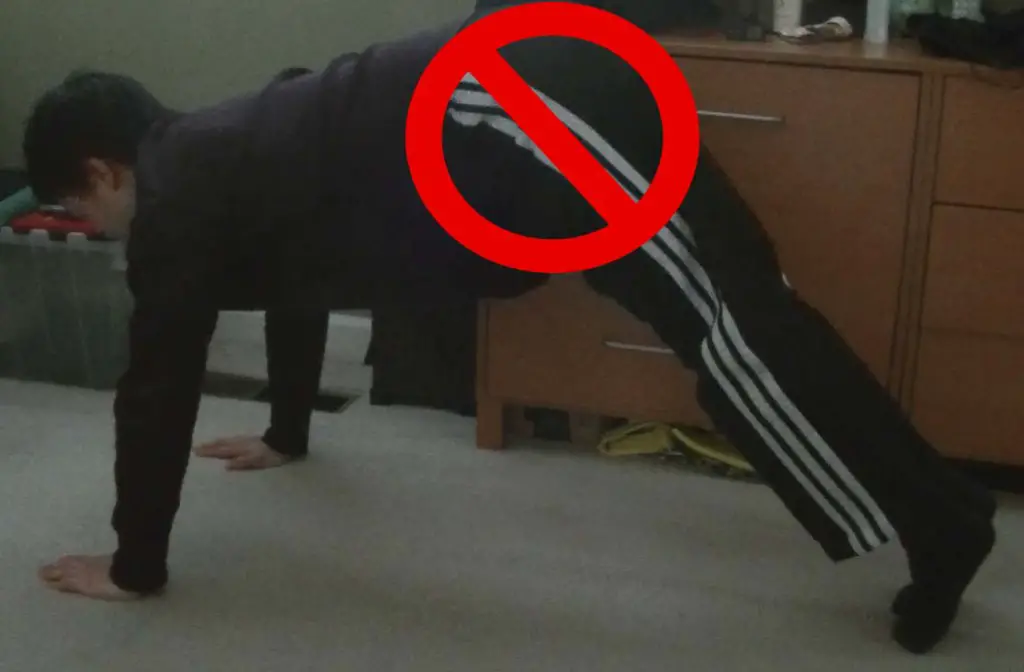
“Caving” is considered less effective and less safe. Struggling through the last push-up of a set like this may be OK (sometimes, form crumbles a little, and you want to keep up intensity!), but never make this a default.
Ending Thoughts
Push-ups are an iconic, safe, and practical compound exercise for everyone. They encourage good upper body pushing strength, promote upper body flexibility, maintain good elbow and shoulder health, and can be done anywhere (especially while watching TV)! What I really like about them is the nostalgia factor: one-armed push-ups are a hallmark skill of the toughest anime and movie characters. I loved imagining I was training just like them… and in the end, I built a body that sometimes surpasses even my fictional heroes. How cool is that?!
Enough gushing. Master the push-up, and never be gymless.
3 replies on “The Push-up – Tutorials and Progressions”
In your main article you have photos of your chest; did you get that definition from push-ups alone? You mention you replaced bench entirely. I’ve been juggling benching as well as push-ups and benching hasn’t been fun for my shoulders or wrists so thinking of taking the plunge as well.
In that article, I primarily did push-ups and dips. I did do dumbbell bench when I was traveling and had no access to a dip bar and a dip belt. Hitting different angles of push-ups does, consistency of habit, and adequate nutrition (aka, protein and sleep) works wonders.
Thanks. I’ve been working my way through these. Just hit low incline wide pushups. Cheers.