If you’re no longer getting results from your current workouts, I have a free bodyweight system that lets you break stalled progress and get stronger. I call it “The Progressive Bodyweight Workout” – the PBW.
WHAT: The PBW is a fitness routine that uses only a pull-up bar. Train 3 days a week, for 60 minutes a workout. There are 7 primary exercises: squats, pull-ups, chin-ups, wall handstand push-ups, leg raises, push-ups, and planks.
Since this workout can be done at home, feel free to watch TV, listen to a podcast, or workout while cooking dinner. Or, simply enjoy the experience. This workout was made to be efficient and principled for a busy life.
WHY: The goal is to get leaner and stronger without getting fatter. To do this, the PBW builds a strength-to-size ratio for both men and women. We aim to sculpt a functional and lean physique without a gym. The focus is on building strength, but you will often lose body fat and gain mobility and balance as side-effects.
HOW: Each exercise has a “Progression” that allows you to modify the exercise to your current level. When you can do an exercise at 4 sets of 8 reps (“4×8”), you move onto the next progression. This creates progressive overload and gradually improves your entire body’s strength, stamina, coordination, mobility, and metabolism. No more arbitrary scale-watching, or relying on “the burn” to direct you –though both can be useful supplements. Instead, we use your current strength as a guide to move forward.
Unlike weightlifting programs, we cannot just increase weight. Instead, we increase resistance by learning a harder progression for each exercise. Every exercise has progressions until you hit a “hallmark skill” like one-armed pull-ups. Acquiring these skills becomes a tangible sign of your hard work and gives you confidence, fitness, and knowledge of your body that will allow you stay strong and fit for the rest of your life.
THIS IS FOR YOU IF:
- You want to get stronger with bodyweight exercises because you want to work out at home, have no gym access, or feel too judged whenever you go
- You want to live longer, by creating a durable, mobile body and building fitness habits that last for life.
- You want to show off a lean, toned body, with a decreased chance of overbulking or becoming skinnyfat (having some fat and zero muscle).
- You are frustrated with how ineffective your workouts are
- You don’t want to dedicate your entire life to fitness, but want a body that looks like you do
- You are totally done with all the fitness fluff and bullshit that exists and want something real
Stop wasting time with worthless “workouts” that are all sweat and no results. Start working out effectively. Welcome to the PBW.
Table of Contents
- Introduction
- Workout Goals
- Exercises
- Equipment
- Frequently Asked Questions
- What does 4×4-8 mean?
- What does 60sec mean?
- I don’t feel “the burn”. Should I add more training?
- What is Progressive Overload, and why is it important?
- Can I do other activities alongside the Roam Strong Progressive Bodyweight Workout?
- Can I add weightlifting, cardio, and other fitness-focused activities to The PBW?
- How long should I rest between sets?
- What should I do between sets?
- How long should I rest between exercises?
- What should my tempo look like?
- Why not use weights?
- How do I warm-up?
- What should I do to cool down?
- Should I stretch before or after workout?
- Should I lift the weights quickly?
- How do I breathe during exercise?
- What if I fail a set?
- Can I workout every day?
- When do I do another program? How long should I stay on the a progressive bodyweight training program?
- How will this affect a woman?
- I don’t want to (insert exercise). What ways can I modify the program?
- Why do you need to progress? Can’t you just add reps to (insert exercise here)?
- How do I work in high repetition work? I find I feel my healthiest when I have it.
- How does this program compare to home-based workouts like P90x, T25, and Insanity?
- I don’t have a pull-up bar. Any replacement exercises?
- What does Step X mean in the Progressions?
- What Style Of Training Is This?
- What if my question is not here?
- Credits, and Thanks
Introduction
“The PBW” Workout Summary
The workout uses only 7 major bodyweight exercises to build strength. Resistance is increased by changing the variant used, forcing your body to adapt.
The main goal is improving on the 7 main exercises by doing harder and harder versions. The consequence is losing fat, “toning up” (by nature of bodyweight progressions), becoming functionally strong, increasing balance & stability, and creating a more durable body that can withstand falling, climbing, jumping, and lifting.
The Progressive Bodyweight Workout consists of 2 primary workouts:
- Workout A: Squat, Pull-Up/Chin-up, Push-up (4×4 to 4×8), Plank (60 sec)
- Workout B: Handstand Push-up, Leg Raise (4×4 to 4×8), Plank (60 sec)
Work out 3 times a week, with at least a day of rest between primary workouts. Rest is extremely important. You train to tell your body, “Time to get stronger.” When you rest, your body responds by rebuilding your muscle, tendon, ligaments, heart, blood veseels… Your body is built while resting, not while working out.
A typical training week is Monday, Wednesday, Friday. You can train Tuesday, Thursday, Saturday… or you can train Monday, Thursday, Saturday. Just get in all your workouts.
You can add Finisher Sets after the primary workout to accelerate results or train more specialized movements if you’re recovering well. There are options to add more activity/workouts for those who want more. See “Finisher Sets” for more on adding to the routine. 4×4-8 means we aim for anywhere from 4 sets of 4 reps, to 4 sets of 8 reps.
Here’s a table of what a sample workout schedule looks like (Week 1):
| Monday | Wednesday | Friday |
|---|---|---|
| Squat 4x4-8 | Handstand Push-up 4x4-8 | Squat 4x4-8 |
| Pull-up 4x4-8 | Leg Raise 4x4-8 | Chin-up 4x4-8 |
| Push-up 4x4-8 | Plank 60sec | Push-up 4x4-8 |
| Plank 60sec | Plank 60sec |
And the next week (Week 2):
| Monday | Wednesday | Friday |
|---|---|---|
| Handstand Push-up 4x4-8 | Squat 4x4-8 | Handstand Push-up 4x4-8 |
| Hanging Leg Raise 4x4-8 | Pull-up 4x4-8 | Hanging Leg Raise 4x4-8 |
| Plank 60sec | Push-up 4x4-8 | Plank 60sec |
| Plank 60sec |
Warm-ups and cool-downs are not necessary, but recommended.
Workout Goals
Gain Strength, Lose Fat, Build and Tone Muscle, Move Better
The primary purpose of Roam Strong’s Progressive Bodyweight Workout program is to get stronger and build/tone muscle while keeping fat down. But, you can tailor your results further with your diet.
There are 2 general diet options based on your goal. You can tailor the PBW to support your body composition goals via diet (with an explanation of options further below):
- To lose more fat and build strength gradually, you will eat a little less than normal.
- To gain more muscle and lose fat gradually (or maintain fat levels), eat a little more than normal.
Here’s a quick bullet list of good practices:
- Eat/drink 0.8 gram of protein per 1lb (1.6 grams per 1kg) of bodyweight. Protein is commonly lacking in most people, especially women. As you begin to workout, you will need more protein to maintain body function and repair muscle tissue. Eating more will not explode you into muscle instantly, despite what media depictions suggest.
- Eat more unprocessed food, eat less processed food. This makes you feel psychologically better, and there are a host of longevity and health benefits that deserve their own guide. For now, here is a list of things that are great to eat:
- Meat such as eggs, chicken, turkey, fish, and grass-fed beef are good.
- Carbs such as brown rice, quinoa, lentils, and beans, root vegetables (e.g. potatoes, sweet potatoes), or fruit (whole or blended, not juice).
- Vegetables in unlimited quantities.
- Milk is ok if you’re not lactose intolerant. Cheese in moderation.
- Nuts are ok with a LOT of moderation. Nuts have a lot of fat and are not that satiating (they don’t keep you full)
- You can technically lose fat and gain muscle on snack foods, but it’s harder for psychological and physiological reasons. It is NOT because they are “toxins” or whatever the naturopath media likes to feed you. It is because it is easier to overeat your calories and not get enough micronutrition.
A diet guide is in the works to describe my philosophy and science behind eating, but a summary is here at The Nomad Diet. Other good options: If It Fits Your Macros (if you want less restriction and more optimization) or the Paleo Diet (if you thrive on more restriction)
I recommend you calculate your Total Daily Energy Expenditure (TDEE) here. This ballparks how much every you burn on an average day. It also gives you calculations on how much you should eat for a Fat Loss goal or a Muscle Building goal.
Build a Fitness Foundation
This workout program is a fantastic habit builder. I have long been inspired by training strength and crafting a head-turning body through bodyweight exercises, ever since witnessing Bruce Lee’s fabled one-armed push-up and from watching too many anime/cartoons. And through my long exposure with exercise culture (over a decade), I’ve perceived a few things:
- People feel judged at the gym, which prevents them from going. Not going creates a habit of not training. This is bad.
- Success is proportional to how working out is perceived (“I hate it” = you’re not going to hit your goals. “I love it” = you’re going to hit your goals). Bodyweight tends to be more enjoyable for more people.
- The more chances to make an excuse, the more excuses made, and the less effort made. Consistent effort is the key to results.
- Bodyweight strength skills are all you need to build 99% of ideal body types, for both men and women
For these reasons, bodyweight training is my recommended plan to teach people how to workout and to change the mindset from dislike, to bearable, to love. Don’t worry, you won’t be posting motivational half-naked people all over Facebook (probably). You will still be you… no trendy $10,000 bikes nor $50/class studios needed.

… Oh wait, they’re anime characters.
Exercises
The main exercises of the Roam Strong Progressive Bodyweight Workout are chosen for their effectiveness. I selected an exercise for the workout because it is a:
- Compound exercises – they work multiple, sometimes ALL, muscles in the body.
- Time tested – many of these exercises (and variants of them) have been around for centuries and used by Greek hoplites (and Spartans), professional fighters, Shaolin monks, and elite military teams. They are a part of the training routines of nearly every effective athlete and warrior.
- Time effective – these are a handful of the best exercises known to man. They challenge your body and force it to adapt without 2-hour long workouts or ridiculous amounts of panting and mental preparation. The result: better body in less time.
- Primary movement patterns – these exercises train distinct movements that are similar to movements in daily life. There will be little circumstance where you are lying on your stomach and curling a single leg up. There will be many circumstances where you need to squat down, hinge at your hips, be balanced, push things above or in front of you, or pull things towards you (or to pull yourself towards something).
- Mostly equipmentless – you can do these exercises anywhere, including in your home, backyard, while traveling, anywhere! It creates a routine that removes potential workout slips. Minimal equipment also means you need no gym membership or $1000+ equipment. The only thing you need is a pull-up bar – which you can buy for $30, or find at a park, or use a sturdy branch.
- Safe – these exercises are a closed kinetic chain. This means they are often safer than their weighted counterparts. If a weight is too heavy for you, there is the chance that you drop it on yourself or you force your joints into inpingement. But, if you fail using your own bodyweight, then you just kinda let it go. The floor won’t crush you, unlike the falling weight. And, unlike being below weights, these exercises only have you manipulating your own body. No spotter to protect you from yourself needed!
Squat
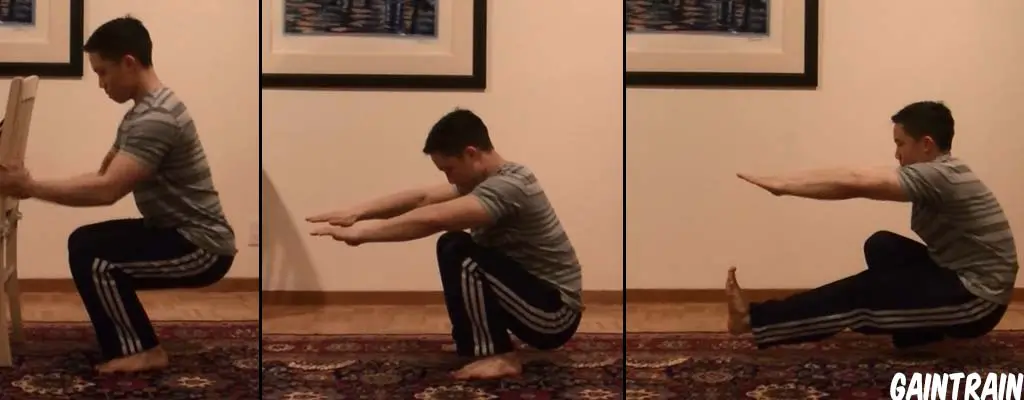
The squat is a compound lower body exercise. You perform a squat by bending at your knees until your calves and hamstrings touch. Then you press your body back up. The squat mainly works your quads, hamstrings, calves, and hip abductors. It also strengthens your abs, obliques (side abs), and lower back.
It is an essential lower body exercise that stabilizes the entire body, improves balance, and makes your core super strong. Squatting motions are used in every athletic pursuit involving the legs. This also teaches your body how to generate power from your legs. You’ll see higher jumping strength, flexibility, and agility with squats. Squat 2 times every week at minimum.
See the Squat progression tutorials here
- Step 1: Assisted Half Squat
- Step 2: Assisted Full Squat
- Step 3: Half Squat
- Step 4: Full Squat (Benchmark Skill)
- Step X: Barbell Squats
- Step 5: Bulgarian Split Squat
- Step 6: Assisted Pistol Squat
- Step 7: Assisted Balance Pistol Squat
- Step 8: Counterweight Pistol Squat
- Step 9: Pistol Squat (Hallmark Skill)
- Step X: Weighted Pistol Squat
- Step 10: Renegade Pistol Squat
- Step 11: Full Shrimp Squat
- Step 12: Elevated Shrimp Squat
Pull-up
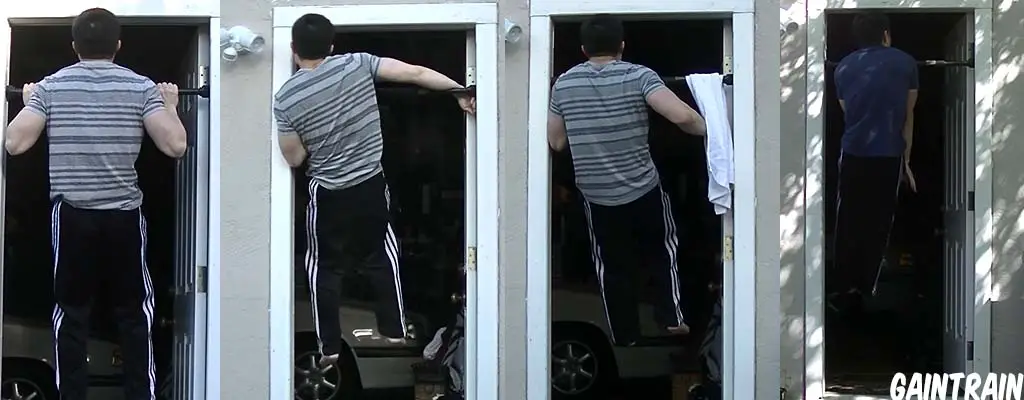
The pull-up is a compound vertical pulling exercise. You start by grabbing a bar with palms facing outward and pulling yourself upward, engaging the lats, the shoulders, the biceps, and your abs (chin-ups activate abs better than some ab exercises) Of course, every muscle in your body sans your legs is helping to pull you up, so the pull-up is a wonderful compound exercise that really engages your all.
This movement allows you to pull your own body over obstacles, pull objects down (from a shelf, or otherwise), and strengthens your climbing muscles. We perform pull-ups every other workout (alternate every workout between “pull-up” and “chin-up”, explained in the next section)
Pull-up vs Chin-up: For a pull-up, your palm will face outward. You can perform the same exercise with palm facing inward (chin-ups, covered below). That variant focuses more on the biceps, but still does lots of work on the back, lats, and shoulders. You see impressive results in physique and strength with both exercises.
See the Pull-up progression tutorials here
- Step 1A: Leg Assisted Pull-ups, or
- Step 1B: 3-Second Negatives Pull-ups
- Step 2: Half Pull-ups
- Step 3: Pull-ups (Benchmark Skill)
- Step X: Weighted Pull-ups
- Step 4: Close Grip Pull-ups
- Step 5: Wide Grip Pull-ups
- Step 6: Archer Pull-ups
- Step 7: Three Finger Pull-ups
- Step 8: Two Finger Pull-ups
- Step 9: Towel Assisted One-Armed Pull-ups
- Step 10: Towel Assisted One-Armed Pull-up + Eccentrics
- Step 11: Half One-Armed Pull-ups
- Step 12: One-Armed Pull-ups (Hallmark Skill)
- Step X: Weighted One-Armed Pull-ups
Chin-up
The chin-up is a vertical pulling exercise.The pull-up tutorial above covers the same progression that a chin-up provides. The only difference: you grip the bar with your palms facing towards you. This movement trains everything the pull-up does, except at slightly different angles. This also focuses more on the biceps and “elbow flexion” that aids lifting objects from the ground with palms facing up. Think lifting boxes and other heavy objects off the floor
They’re also one of the best ab exercises. Not kidding. Chin-ups also have some of the highest ab activation scores of the lower rectus abdominis (via an EMG experiment that Dr. Contreras ran years ago), making them one of the best ab exercises known.
Combined with squatting, this exercise will let you lift almost anything you need to lift.
See the Chin-up progression tutorials here
- Step 1A: Leg Assisted Chin-ups, or
- Step 1B: 3-Second Negative Chin-ups
- Step 2: Half Chin-ups
- Step 3: Pull-ups (Benchmark Skill)
- Step X: Weighted Chin-ups
- Step 4: Close Grip Chin-ups
- Step 5: Wide Grip Chin-ups
- Step 6: Archer Chin-ups
- Step 7: Three Finger Chin-ups
- Step 8: Two Finger Chin-ups
- Step 9: Towel Assisted One-Armed Chin-ups
- Step 10: Towel Assisted One-Armed Chin-ups + Eccentrics
- Step 11: Half One-Armed Chin-ups
- Step 12: One-Armed Chin-ups (Hallmark Skill)
- Step X: Weighted Pull-ups, High-rep Pull-ups, Weighted One-Armed Pull-ups
Wall Handstand Push-up
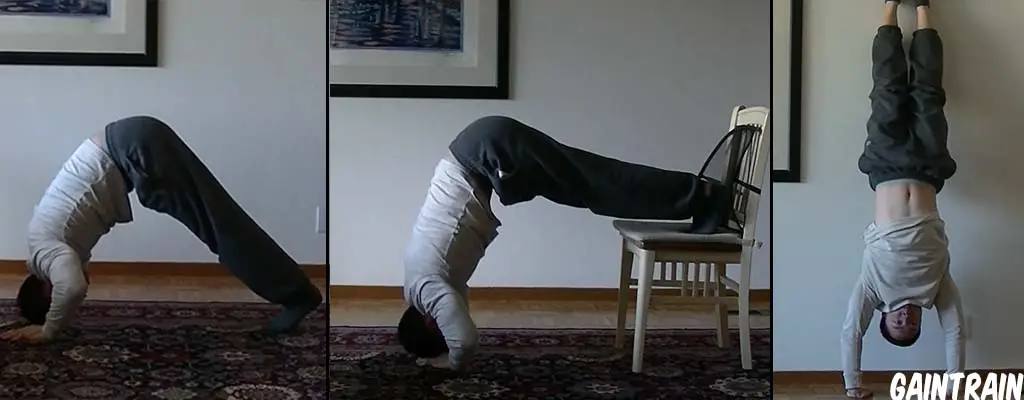
The wall handstand push-up is a compound vertical pushing exercise. Perform a handstand push-up by getting into handstand position, letting yourself down slowly, then pushing yourself up through your shoulders. This big movement works your shoulders, triceps, and your upper chest. You also stabilize with your legs, traps, back, and abs, making this a full body movement.
This movement allows you to push/lift objects up while remaining stable. You will be able to boost anyone to a higher grocery aisle shelf! Expect improved shoulder strength and stability.
You don’t need to be able to do a handstand for this exercise. You will lean against the wall, eliminating most balance from the equation. Note for our purpose of creating stronger, healthier, balanced shoulders, learning a freeform handstand push-up is not necessary. This is a separate skill that can be practiced as a Finisher Set.
See the WHSPU progression tutorials here
- Step 1: Incline Pike Press
- Step 2: Pike Press(Benchmark Skill)
- Step 3: Diamond Pike Press
- Step 4: Decline Pike Press
- Step 5: Decline Diamond Pike Press
- Step 6: Bending Wall Handstand Push-ups
- Step 7: Wall Handstand Push-up Negatives
- Step 8: Half Wall Handstand Push-ups
- Step 9: Wall Handstand Push-ups (Hallmark Skill)
- Step 10: Close Wall Handstand Push-ups
- Step 11: Elevated Wall Handstand Push-ups
- Step X: Overhead Press (Barbell), Weight Vest Wall Handstand Push-ups
Push-up
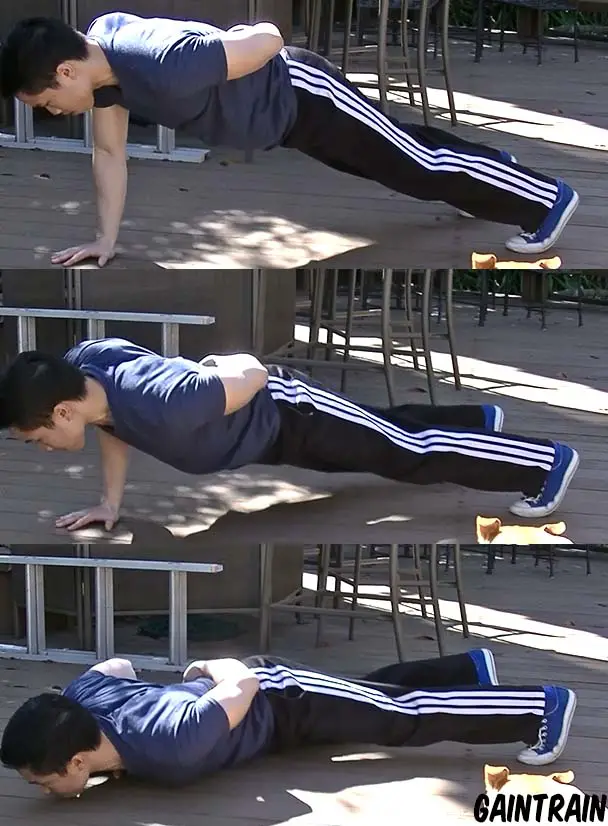
The push-up is a compound horizontal pushing exercise. Perform it by placing your feet on the ground, and hands shoulder width apart. Lower yourself down until your chest touches the ground, then push up through your arms and chest. This movement works your triceps, chest, and front shoulders. It also helps develop your upper back, lower back, and abs as you stabilize the movement.
Horizontal pushing increases your ability to produce force directly in front of you. The most obvious benefit is punching. Some less obvious benefits include faster running (due to training the “serape effect,” or the relationship between shoulder and hip), throwing motions, and pushing heavy objects like boxes or a car.
See the Push-up progression tutorials here
- Step 1: Wall Push-ups
- Step 2: High Incline Push-ups
- Step 3: Low Incline Push-ups
- Step 4: Push-ups (Benchmark Skill)
- Step X: Weighted Push-ups
- Step 5: Close Push-up/Diamond Push-ups
- Step 6: Wide Push-ups
- Step 7: Low Decline Push-ups
- Step 8: Low Decline Close Push-ups
- Step 9: Low Decline Wide Push-ups
- Step 10: High Decline Push-ups
- Step 11: High Decline Close Push-ups
- Step 12: High Decline Wide Push-ups
- Step 13: Wall One-Armed Push-ups
- Step 14: High Incline One-Armed Push-ups
- Step 15: Low Incline One-Armed Push-ups
- Step 16: One-Armed Push-ups (Hallmark Skill)
- Step X: Weighted Push-ups, High-rep Pushups (varying angles and widths), Weighted One-Armed Push-ups, Bench Press
Hanging Leg Raise
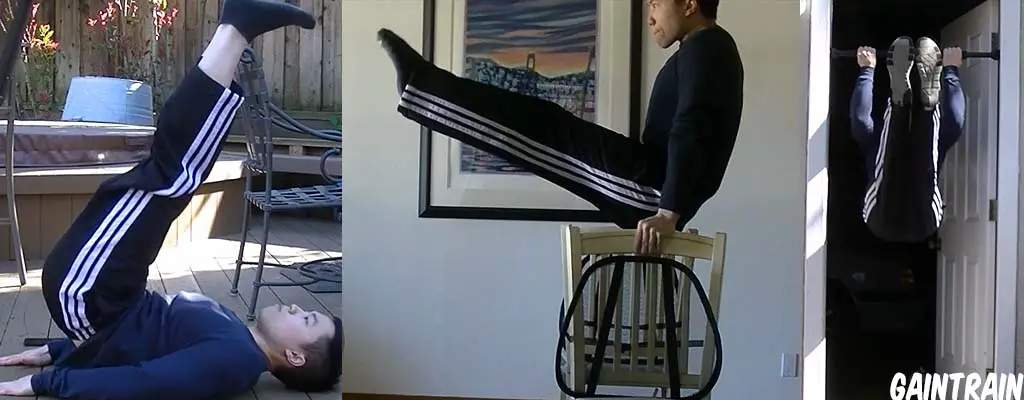
The leg raise is a compound core exercise that strengthens the front and back side of your core. Perform a leg raise by hanging from a bar and moving your legs until they are parallel with the floor. It primarily targets the abs, obliques (the sides of your abs), and lower back. It also strengthens hip flexion and extension, and stabilizes the legs.
The movement will make your entire core very stable and strong. A stable core increases your ability to perform every possible movement, and armors your midsection with ab muscle. And, lets face it… everyone wants visible abs. This will get you there paired with a fat loss diet.
See the Hanging Leg Raise progression tutorials here
- Step 1: Lying Knee Raise/Reverse Crunch
- Step 2: Lying Bent Leg Raise
- Step 3: Lying Straight Leg Raise
- Step 4: Pulse-Up
- Step 5: Lying Windshield Wiper
- Step 6: Parallel Knee Raise
- Step 7: Parallel Bent Leg Raise
- Step 8: Parallel Straight Leg Raise
- Step 9: Hanging Knee Raise
- Step 10: Hanging Bent Leg Raise
- Step 11: Hanging Straight Leg Raise (Benchmark Skill)
- Step 12: Hanging V-Raise
- Step 13: Hanging Fan Raise (Alternating V-Raises)
- Step 14: Hanging Windshield Wiper (Hallmark Skill)
- Step X: Ankle-Weighted Hanging Straight Leg Raise, Ankle Hanging Windshield Wipers, High-Rep Hanging Straight Leg Raises
Plank
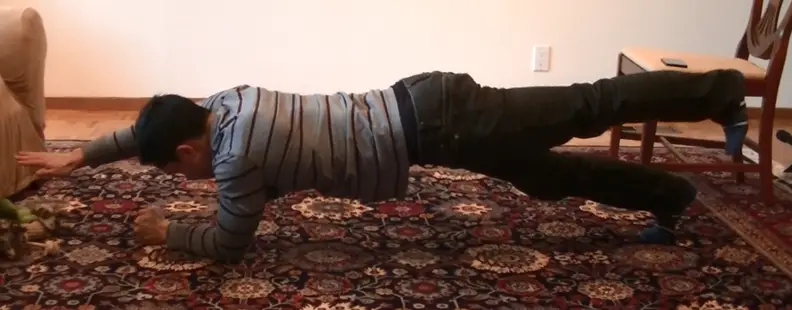
The plank is an isometric core exercise that strengthens your stabilizers, abs, and posterior chain (collectively, “the core”), and trains the synergistic flexing of multiple muscles. Perform the exercise by getting down on the floor in push-up position, feet together. Rest your forearms on the ground comfortably. Stay in position for as long as possible, feeling the exercise in your abs.
Like leg raises, the core supports every activity you will ever do in life and in fitness. That’s why there’s a core-specific exercise every workout – and to clarify, every exercise preceding the plank also utilizes your core.
See the Plank progression tutorials here
- Step 1: Wall-Assisted Plank
- Step 2: Kneeling Plank
- Step 3: Kneeling Side Plank
- Step 4: Straight-Arm Plank
- Step 5: Plank (Benchmark Skill)
- Step X: Weighted Plank
- Step 6: Side Plank
- Step 7: One-Legged Plank
- Step 8: One-Legged, One-Armed Plank
- Step 9: One Legged, One-Armed Side Plank
- Step 10: Wall Plank
- Step 11: Wall Plank March (Hallmark Skill)
- Step X: Weighted Plank, Weighted Wall Plank March
Accessory Exercises (Finisher Sets)
Finisher Sets are exercises that we do after the primary workout. There are a few reasons why you would add Finisher Sets:
- Improve a lagging body part or function – think your abs need more pop? You have free reign to do more ab exercises. Want stronger calves? Do a few sets of calf raises.
- Add cardio – this program is primarily strength and body composition focused. If you want more cardiovascular health, then adding it here is the best idea. Too much cardio before strength training decreases power output, BUT cardio after strength training improves recovery (and thus, improves your strength and body composition). I personally do a little bit of low-intensity steady-state cardio (LISS) post-workout (10, maybe 20 minutes) or a small bout of high-intesity interval training (HIIT) for 4 minutes.
- Add more training volume – if you just reached a progression (4×8), yet you feel like doing more? Do you want to get stronger, faster? Then absolutely do more! You can do more of the same exercises, or complete some accessory exercise. More explained below.
- They are super fun – you need the primary workouts to build an excellent body. The finisher sets are for your enjoyment. I think chin-ups are super fun, so I do them post-workout. If you want to shadow box, dance, whatever, this is a great time to do it.
Here are some finisher set ideas:
- High rep burnout sets – Some people love the feeling of muscular exhaustion. There are merits to it; it can prompt muscular adaptation even in the high rep range – that is, you can gain strength and muscle size from lower weight, if you exhaust your muscles. It improves muscular endurance – your ability to do more, in less time. I like to exhaust with chin-ups after Workout B – the extra volume just feels good!
- Accessory exercises – These are exercises that mostly work a single muscle. Examples include crunches, sit-ups, V-ups, bicep curls, lateral raises, ab wheel rollouts, and calf raises. From what I’ve observed, men like to add more bicep, upper body, and ab work work (chin-ups/bicep curls, handstand push-ups/shoulder press, all ab exercises). Women like to add more glute, leg, and ab work (glute bridges, calf raises, sit-ups and v-ups). Use finisher sets to craft specialty areas of your choosing.
- Skill work – skill work refers to isometric holds that are popular in gymnastics. Examples are the L-sit, front lever, back lever, and planche. Isometric holds post-workout are great for circulation and creating better mind-body connection. That is to say, they create great non-muscular strength gains by teaching your body to use the muscle you already have, better. They also add a little bit of muscle and force your body to keep fat off, as any extra fat makes skill work harder.
- Cardio – Post-workout cardio for 5-10 minutes is nice for circulation and cooling down.
Why are they called “finisher sets”? I think of training like a meal. The entree (primary workout) builds you up and makes you strong, healthy, and wise. The finisher is a dessert: it is fun, but not necessary. It’s an addition to an already great meal. By doing your entree workout first, I am forcing your body to grow stronger and keeping you on track. However, once you complete it, I give you free reign to practice some little skills you’d like to hone for fun and make this training uniquely yours. When I was weightlifting, my dessert after most workouts was bicep curls! But if I jumped in to do bicep curls first, I would not feel obligated to do my squats, an exercise that is unarguably more important for a fitness foundation.
Equipment
Pull-up Bar
The only necessary piece of equipment is a pull-up bar. There are substitutes, but I recommend investing in one. While traveling, most hotel gyms will have some light dumbbells and a place to do pull-ups. If not, grab a tree branch, door frame… you get the picture. Grab something that can support you, and pull up!
Supplements
You don’t need most of them. You can get by with any multi-vitamin (as long as you don’t get upset stomach), some supply of calcium (you can grind up baked eggshells, take Tums, or get calcium tablets), and whey protein if you have trouble hitting 1g of protein per pound of bodyweight. That’s 1g of protein per .45kg if you’re on the metric system.
If you’re having trouble recovering, or want to gain strength a little quicker, you can supplement with creatine monohydrate. Examine.com has a great article on creatine and safety.
Clothing, Gear
Other equipment is not needed, but some people feel more comfortable with it. Here are my thoughts on some lifting gear:
- Gloves – The only time I recommend gloves is when a pull-up bar is in direct sunlight (and thus, is too hot to the touch) or a pull-up bar is freezing cold. Don’t use gloves for extra grip strength (exception: deadlifting). Most of the time, I get a better grip without gloves. The gloves I use are Mechanix Vents when the bar is too hot or my hands are callous-covered. I prefer bare-handed.
- Wrist wraps – If your wrists hurt due to orthopedic issue, wrap your wrists in ACE bandages or find a dedicated fitness product. I used a brandless compression wrap when I had a ganglion cyst pushing on a nerve in my right wrist. That helped cut down on the pain and create better wrist stability.
- Knee sleeves – I support knee sleeves. My mom loves them, my grandma likes them, and I adore them. If your knees hurt, try them out.
- Elbow compression sleeves – I fully support elbow sleeves! Back when I miffed up my right elbow and right shoulder while bench pressing, elbow sleeves were the only way I could cut through the pain. While I now recommend taking a break from injury such as nerve impingement or inflammation, I support elbow sleeves if you feel you must workout, or if you are simply being preventative with any elbow issues. Note, sleeves are no excuse for sloppy technique (best word to describe my benching in sophomore year of college).
Frequently Asked Questions
What does 4×4-8 mean?
4×4-8 means 4 sets of 4 reps, to 4 sets of 8 reps of one exercise. The program calls for 4 to 8 reps to allow progression. Here is an example: you are doing Workout A beginning with pull-ups. You are able to do 4×8 of Half Pull-ups. Next workout, you will do 4×4 Pull-ups. Then, you will do 4×5. If you cannot do 4×5, you can do 5/4/4/4, then 5/5/4/4, then 5/5/5/4, then 5/5/5/5. Then you shoot for 4×6. You repeat this for each exercise progression until you can do 4×8. Then you move up a progression and begin anew.
Try to never dip below 4×4. That normally means you did not master your 4×8. However, some have had success starting from 4×3, and working up to 4×8. As long as you are gaining strength each workout, you are progressing correctly.
What does 60sec mean?
You hold an exercise for 60 seconds. This only applies to planks in this workout program.
I encourage trainees to hold a plank for as long as possible with a stopwatch/timer nearby. If you can’t hit 60 seconds straight, you would hold for as long as possible, take a 10-30 second break, then hold the plank a little longer. Keep taking small breaks until you hit 60 seconds. When you can hit 60 seconds without a break, you can progress to the next plank progression.
A quick example: I try to hit 60 seconds in a basic plank. I hit 30 seconds before I am too tired to hold. I take a break of 25 seconds. I then hold my plank for 20 seconds. I take another 25 second break. I hold my plank for 10 seconds to finish the extended set. I am now done. That adds up to 60 seconds total.
Note: This timing scheme is used for other isometric progressions, such as the front lever, the back lever, the planche, and the L-sit. However, these isometric exercises are more skill-based than intensity based. I prefer the plank for its ease of completion. These other skills can be worked on as accessories or as “dessert exercises” on rest days/post-workout.
I don’t feel “the burn”. Should I add more training?
Let’s debunk one myth. You don’t need to “feel the burn” to force muscular adaptation. Feeling the burn doesn’t mean you are burning extra calories or doing something right. That said, some people simply love to work out, or want to work out more. This is good motivation! In that case, you can do these post-workout:
- Do AMRAP (as many reps as possible) of a muscle group you worked that day. Work your muscle group until failure. Exhaust yourself safely.
- Perform a set of “dessert exercise” – an accessory movement that targets a specific area of your choosing. A common “dessert exercise” is bicep curls at the gym. For bodyweight workouts, it generally means ab exercises!
- High intensity interval training – Tabata Sprints, for example
- Running, cycling
- Yoga, static stretches
As long as your extracurriculars don’t strain your muscle, find what works best for you. Or do what I do – stretch post-workout for 2 minutes, and walk it off.
What is Progressive Overload, and why is it important?
Progressive overload is a fundamental concept in strength training. A little Lifting 101: your body needs to experience new, challenging loads (weight, resistance, whatever you want to call it) to prompt your body to become stronger. As long as you are challenging your body with increasingly difficult exercise, you will see strength gains.
The progressive in progressive overload refers to progressively increasing resistance so your gains in muscle/strength/fat loss do not stall. If you are not challenging your body with progressively challenging loads, your body adapts and the workouts will simply keep you at your current skill level. You won’t gain any more strength/muscle, and you won’t lose any more fat. That’s the problem with most calisthenics/bodyweight workouts. They just don’t add extra resistance!
If your plan is to get stronger, you need to train with heavier stuff… period! Since the goal of the RoamStrong System is not to be tethered by the necessity of weights, we use leverage to make exercises progressively more difficult. That change in leverage and increased resistance is the same as increasing weight. Your body doesn’t know the difference between lifting up actual weight or lifting your body. It just knows that the load is bigger and more strenuous, so it needs to adapt and get stronger.
Now, whether you want to get stronger at a certain point is up to you. Some people are content never hitting a one-armed chin-up, and that’s their choice. My biggest goal is to arm you with understanding of how your body works instead of fruitlessly following exciting workout-of-the-days. Most people want strength and a lean body without a bunch of the work. That’s what my system focuses on.
Can I do other activities alongside the Roam Strong Progressive Bodyweight Workout?
YES! It’s encouraged! You can run, climb, hike, help friends move things, garden, anything you want. It’s your life, and a good workout should make it better by giving you back your confidence, your strength, your health, your durability, and your agency. That’s the reason why I created it.
Can I add weightlifting, cardio, and other fitness-focused activities to The PBW?
There are options to add “dessert” exercises, or non-primary exercises, to customize your program. There are also options to add weight training. You’re absolutely free to add stuff in or take elements of my system and place it into others. It’s a free country (God Bless the USA!) And if you’re in another country, well, I just hope there aren’t any “Fitness Police” lurking around…
How long should I rest between sets?
The rest period is 3 to 4 minutes. If your strength is plateauing (meaning you don’t see improvements over 2 weeks), you can take a slightly longer break at 5 minutes per set. That will give your body time to recover ATP, an energy source utilized during anaerobic (oxygen-less) exercise. That’s a fancy word for the exercise that you’re doing. So you’ll have a little more oomph in your lifts with those longer breaks.
Most people I teach do not need that long of a break normally, so save your longer breaks for plateaus.
What should I do between sets?
Walk around, stand, move your arms in circles, watch TV, anything really. I walk about and swing my arms, breathing. That lets the blood circulate a bit. Sometimes I just stand still and absorb the peace of the moment. Some people like to jog during their rest period- getting in cardio between sets accelerates fat loss, but may tire you out and detract from the strength training. Experiment and do what you like.
How long should I rest between exercises?
I rest about 30 seconds between exercises (for example, from Squats to Pull-ups). If you’re particularly winded, take a longer break. You want to be refreshed and ready to train when the next exercise starts.
What should my tempo look like?
Tempo is the timing within the performance of a single rep (more here). Perform the concentric phase (the push or pull) as fast as possible while under control. Pause very briefly (0 to 1 second) between the concentric and eccentric phase. Perform the eccentric phase for 1 to 2 seconds. Take 0 to 1 second between reps.
If you find better performance in a different tempo, feel free to change it up. I optimized this tempo for new trainees to feel the muscles they’re working and establish mind-body connection. Some people can’t even flex their forearms!
Why not use weights?
I am fond of saying – it all depends on your goals. My primary reason for creating this program is to break the stereotype that strength training is only for meatheads and that cardio and starving yourself is how you get abs and stay healthy. Most people’s ideal body type is the athletic, toned look. Bodyweight strength training is suited for this.
Below, I outline some advantages bodyweight strength training has over conventional weightlifting and cardio. Note, I absolutely support weightlifting (when done progressively) for both strength and bodybuilding, and I support cardio for… well, getting better at cardio. That said, the advantages are below.
Advantages Over Weightlifting:
- The goals force functional muscular performance – the heavier you are, the harder the exercises. The program removes the ability to fail. You can’t be sloppy and still progress like weightlifting, where you can simply eat a lot more to recover your muscles and gain strength, but could easily gain fat. For new trainees, this is super important in building good habits. I’ve seen a lot of bad bulks while weightlifting but never bad bulks when on bodyweight exercises. Basically, you won’t get fatter while getting stronger when you do bodyweight strengh training because it self-regulates.
- Can exercise anywhere – most trainees look for excuses for not working out. Bodyweight strength training eliminates the excuse because you can do them anywhere, even in front of your TV. I used to do workouts in my cubicle! The idea is, you literally never have an excuse not to work out, which creates a habit. Soon, you find yourself craving the sensation of calisthenic movement, so you never stop wanting to work out, period. I’m building you a lifetime love of fitness.
- Less fear of “being bulky” – though you will NOT swell to Arnold proportions with weight lifting, the preconceived notions that simply holding weights will make you look like you’re a steroids keeps people from strength training. Bodyweight strength training is a milder alternative that people are not as scared to train, and is way better than exclusive cardio for sculpting a body. Of course, both together is the winning combo.
Advantages Over Cardio:
- Cuts fat without sacrificing muscle – only doing cardio melts your muscle away. If you want a toned look, you cannot only run. Bodyweight strength training will preserve your muscle while burning fat so you can get the toned look. Take a look at endurance/marathon runners. That’ the body you’re likely to expect with cardio alone.
- Shorter workout time – cardio generally takes an hour or more. Bodyweight strength training takes about 40 minutes for a full workout. Further, you can break up your workout throughout the day – Do Handstand Pushups in the morning, then Hanging Leg Raises at night.
- More effective fat burning – having muscle means your body burns more calories while idling and resting. You know why athletic people can eat a lot? It isn’t because they move around a lot (though that contributes). It’s because they have lots of muscle that burns energy during rest.
- Improves joint strength – Cardio destroys joints. Strength training strengthens them. This is important for lifelong fitness.
- Easier to show off – most people can’t do the imtermediate skills. Imagine how impressed people are by one-armed chin-ups and one-armed push-ups. Running very long distances simply can’t compare (oh, and it might be hurting you)
- More fun – I like running, but not past 10 minutes. It is way more fun to lift yourself with one arm above things. You feel like you are flying.
- No sweat – Strength training doesn’t need to make you sweat a bunch to be effective. You can get stronger and barely break a sweat, unlike cardio.
- Better body type – totally personal opinion. Not many people (guys or girls) look at endurance athletes and say they want that physique. On average, a bodyweight strength athlete (such as a gymnast) will have a more desirable body type.
Everyone should be able to run and sprint, and if your primary goal for cardio is being better at cardio, I support that.
However, if you want to be more durable, have better joints, look better, feel stronger, build the fitness habit more easily, and have a flexible fitness base for any activity (rock climbing, hiking, backpacking, sailing, helping your friends move, evading capture), then bodyweight strength training is the way to go.
How do I warm-up?
Warming up is a good idea. It helps prevent injury, . You only need a minute or 2.
There are a few options – you can do 1, or all of them:
- Do a set of the progression preceding your current progression. For example, if my working set (what I am 4×8’ing) is Pull-ups, the preceding progression to warm up on is Half Pull-ups. A set of 8 reps focusing on technique and warming up are recommended.
- Jog in place for a minute (or more)
- Do dynamic stretches (tutorials to come later; these can improve agility AND warm you up at the same time. Talk about efficient!)
- Don’t do a warm-up
Do NOT do these for a warm-up:
- Lots of static stretching, such as splits, hamstring stretches, calf stretches. A little to loosen up is fine, but too much neurologically puts you into sleeping mode. That’s why stretching is great before bed. Not so great before workout.
What should I do to cool down?
I recommend static stretching that target muscle groups you just used. Here’s a small list (tutorials to come):
- Broomstick dislocates / band dislocates
- Butterfly stretch
- Splits (or split progression)
- Calf stretch
- Hamstring stretch
- Quadracep stretch
I admit, I get lazy when it comes to stretches. Ideally, you do these all after every workout for 10-20 seconds each. I tend to just do hamstring stretches (everything else I have stays flexible… go figure!)
You can also walk around, jog a bit, lie down on your back. I don’t recommend sitting if you just finished squatting; this can limit your flexibility. Imagine your legs like warm taffy. Stretch it out and let it cool down, it will stay flexible and primed. Let it cool all bunched up, and it will be stuff and inflexible.
Should I stretch before or after workout?
Dynamic stretching before, static stretching after is the best way to do it.
A few of my favorite dynamic stretching exercises (tutorials to come later; Youtube these for now):
- Shoulder circles
- Full-body circles
- Front leg swing
- Side leg swing
- Front leg raise
- Side leg raise
- Wrist extension and wrist release
A few of my favorite static stretching exercises:
- Broomstick dislocates
- Butterfly stretch
- Splits (or split progression)
- Calf stretch
- Hamstring stretch
- Quadracep stretch
Should I lift the weights quickly?
The concentric phase (the “pushing” or “pulling” part of the exercise) should be done as quick as possible while under control. The eccentric phase (
If you’re not familiar with concentric vs. eccentric phases, read my page on notation, which has a section on them.
How do I breathe during exercise?
There are 2 ways I like to breathe:
For the 1-8 rep range, here’s how to do it for the primary exercises:
- Squat: Deep inhale. Hold your breath while descending. Continue to hold it while at the bottom. Continue to hold it while pushing upwards. Exhale at the top.
- Pull-up/Chin-up: Inhale. Jump up to the bar. Exhale as you pull up. Exhale completely at the top. Inhale as you let yourself down.
- Handstand Push-up: Inhale as you get into position. Exhale in position. Inhale slowly as you let your body down. Exhale as you push up.
- Leg Raise: Exhale as you swing your legs up. Inhale as your legs come back to neutral.
- Push-up: Inhale as you go down. Exhale as you go up.
- Plank: Continually inhale and exhale slowly, but steadily.
For the 9+ rep range, I simply inhale on the eccentric portion of the exercise and exhale on the concentric portion of the exercise. I pay less attention to the form of my breath, other than trying to continually exchange fresh air into my lungs.
On those final, hard reps, I may start to use the Valsalva maneuver. This technique helps you stay tight and stable during the movement when under weight.While bodyweight strength training doesn’t have you under a bar, some aspects of the technique help create internal tension to lift yourself more effectively. Breathe in, hold your breath, perform the lift, then exhale. That’s it!
What if I fail a set?
Here’s a hypothetical scenario. You’re aiming to get 4×8, or 8/8/8/8. Your first two sets are completed without a hitch. The third set, you get 5 reps. So you’re now at 8/8/5. At this point, take a breather for 3-5 minutes (this rest will help you regenerate your ATP, allowing near-maximum ability). Then try hitting your goal reps for the next set.
If you manage to get 8/8/5/8, congrats! Next time, you will almost certainly get 8/8/8/8. Consider this a victory.
But, let’s say you manage 8/8/5/5. No problem. Next time, you can simply add a rep or two to your failed sets as a goal. So 8/8/6/5 or 8/8/6/6 would be your next goal.
As long as you increase by at least 1 rep each time, you are progressing.
Can I workout every day?
I would not recommend doing the workouts everyday. If you feel unchallenged, simply change progressions until you are challenged. Amount of exercise does not mean better gains. It’s the intensity within each rep and progressive overload that creates body adaptation. If you are seeing strength gains yet are recovering greatly, call it a blessing!
If you’re asking about doing other activities (like rock climbing, hiking, etc) I advise that you absolutely do that. Life is way too short to worry about strict program adherence. You can gauge how you feel after activity. If not too sore, continue the plan. If a little sore, just move your workout day back a day!
When do I do another program? How long should I stay on the a progressive bodyweight training program?
As long as you want. The ultimate goal is doing all the progressions at 4×8. At that point, you will need to clarify your goal: do you want to get even stronger? Do you want larger muscle? Do you want to burn more fat?
If you want to get stronger or build larger muscle, you can bump the sets up (for example, to 5×10), or you can start adding weight. For example, I can bang out one-armed push-ups easily, so I have people sit on my back to add resistance. This is basically the bodyweight equivalent of progressive overload — a principle that you get stronger when you load more. You can also move onto a weightlifting program. Of course at this point, you’re probably in great shape and have a wonderful fitness habit. You’re a self- expert in your own right, so continue to learn, experiment, and train towards your own optimization and goals!
How will this affect a woman?
Women tend to recover slower than men. This is due to less testosterone production (and other differences), which helps signal the body to synthesize new muscle.
Your progression will likely be slower than a man’s. Nothing else will be different. You won’t become bulky, and it is easily reversible even if a wizard magically made you that way. Simply stop working out to lose muscle — easy.
I don’t want to (insert exercise). What ways can I modify the program?
I don’t recommend you modify it if you do not have experience with workout programming.
If you are intermediate in the fitness world, use your best judgment in programming or adapting components of this program.
If you don’t want a certain exercise because you don’t like it, I recommend you give it a shot. I chose the exercises for a reason.
If you are physically unable to do the exercise, we must figure out a way for you to work up to it. Are you currently too weak? There are low-level progressions made for you to build up your strength. Not flexible enough? Practice the movement and stretch it out. When in doubt about a particular exercise, ask Reddit’s r/bodyweightfitness, my r/gaintrain forum, or leave a note in the comments.
Why do you need to progress? Can’t you just add reps to (insert exercise here)?
Unlike other bodyweight programs, we do not exclusively emphasize high-rep challenges. Though they offer good benefits – increased muscular endurance, improved focus, quantifiable progress – they are not optimized for long-term progress, nor do they effectively build stronger muscles on their own.
A program focusing exclusively on high-rep pump-and-burn have diminishing gains. There is only so much repeatable intensity that can be made by doing hundreds of push-ups, pull-ups, and sit-ups every day. While you could certainly build impressive physiques with such a regimen (in science speak, by exhausting Type I muscle fibers to the point where Type II fibers need to act), they are not optimized for strength gains or progressive longevity.
The purpose of the RoamStrong System is to create a fitness habit and strong muscular foundation, especially in a way that doesn’t interfere with other activity.
How do I work in high repetition work? I find I feel my healthiest when I have it.
You can work in high repetition strength training for 1 or 2 days a week, if you choose. More than that may require a stronger athletic base.
Add to the program as you please, as long as you don’t lose sight of the progression goals. If you’re continuously improving, then you are succeeding.
A little high rep work can also be handy to break a progression plateau. When I stall on progression, I sometimes take a day to slam out as many push-ups, pull-ups, and pistol squats as I can. It reinvigorates the excitement of the workout.
How does this program compare to home-based workouts like P90x, T25, and Insanity?
These home-based programs tend to focus on high intensity interval training exclusively. They provide a hefty cardiovascular challenge, but they will not maintain (let alone build) muscle the way a program utilizing progressive overload will.
These workouts are appreciated for their convenience. My brother had an Insanity workout spree for his first months in consulting – this was because after a long day of work and lack of good equipment in hotel rooms, he needed something, anything, to maintain his good physique.
For various reasons, high repetition cardio challenges (P90x, Insanity, Pushup/Squat Challenges) do not create the habits or foundation desired of the RoamStrong System. They lack a focus on creating strength and seeing progression through performance, rather than arbitrary scale numbers or looking in the mirror. When progression is clear, people stick to a program. Making progress an objective measurement (outside of scale number) creates better habits and better strength.
You will see better results on the RoamStrong System than those programs, guaranteed. And it’ll be easier to accomplish.
I don’t have a pull-up bar. Any replacement exercises?
Pull-ups and chin-ups are irreplaceable. It is one of the best, most effective, time efficient, compound exercises known. There is no alternative to doing them.
I recommend investing in one. Most sell for $30 dollars, and will be the best investment you will ever make in a fitness product. I use an Iron Gym pull-up bar, but feel free to visit a sporting goods store and shop around for one that suits your needs.
If you absolutely cannot get a pull-up bar or find one nearby, here are some alternatives. Be safe, and make sure it can support your weight:
- Your door – most doors and hinges are strong enough to support bodyweight. However, long term use may harm hinges and will cost multiples over simply buying a pull-up bar. So yeah, buy a pull-up bar!
- Your door frame – if your door frame is sturdy, you can place your fingertips on it and pull up. This is quite difficult if you cannot already do a pull-up… so get a pull-up bar.
- Trees – tree branches can be a bit uneven (makes things a little difficult), but you can certainly do pull-ups on them. They tend to be very sturdy.
- Support beams – support beams are often sturdy enough to support bodyweight
- Other places – you can do these in attic rafters, on railing, on a clothes drying rack, on the backs of stairs, anything that can support your weight! Or, save time and buy a pull-up bar!
What does Step X mean in the Progressions?
Step X refers to a weighted progression. When either A) you are tired of doing progressions or B) you want more of a pure strength challenge, you can utilize weighted variants. In this way, the workout system can always challenge you, even when you can nail out 4×8 one-armed chin-ups! I recommend using weight when both limbs are touching the ground (so weighted Push-ups > weighted One-Armed Push-ups) as this forces you to use more raw strength from your targeted muscle groups and allows you to focus more on power generation and less on technique.
If you can manage weighted one-armed/one-legged techniques, more power to you. At that point, you know your body well enough to decide on your own!
What Style Of Training Is This?
This is progressive bodyweight strength training – also known as progressive calisthenics. Let’s break that down:
- Progressive. This implies a goal – that we are PROGRESSING, not stalling.
- Bodyweight. This imples you’re moving your body to achieve this progression, rather than moving external weights. This doesn’t mean I’m against weights (quite the opposite, in fact). It just means that this system uses bodyweight mastery to achieve progression rather than stacking weight.
- Strength. This implies the major focus is on improving strength. And by focusing on strength, we achieve a myriad of subsidiary outcomes, like losing fat, gaining muscle, moving better, and living longer. The combo of “bodyweight” and “strength” implies that you aren’t just lifting max numbers – you’re lifting with max efficiency for your weight.
- Training. This implies that you’re aiming for an outcome. Training is always training for something. What separates exercise from training is this intention. Exercise is content to be movement for movement’s sake – and that’s not a bad thing. Training is movement for a specific goal – FOCUSED exercise. And by now, I think you know what that goal is.
Systems such as these are sometimes called “Progressive Calisthenics”, too. It’s the same thing – but I couldn’t make an acronym out of it (“PC”is a little monopolized).
What if my question is not here?
Feel free to send questions via my contact form. Better, comment on the post so others can benefit from the knowledge shared!
I will respond to you, and potentially update the FAQ. If you’d like credit for asking a question, let me know. Otherwise, I keep it anonymous.
Credits, and Thanks
Thank you to my friends for always pushing me to write this all down. I wish you all the best in your fitness goals!
Thank you to my parents, for always pushing me to follow my dreams and for housing me when I decided I wanted to write full time.
Thank you to Stronglifts 5×5, whose format and programming inspired the format of this guide.
And most importantly, thank you to all the wonderful people who have continued to bravely live despite feeling bad in their own skins. I created this program just for you. Social Physique Anxiety – feeling like everyone, everywhere is judging your body – is something I have lived firsthand. You are never alone. I created this program to allow anyone to reach their fitness goal without feeling embarrassed at the gym, and to build enough confidence to break free of that anxiety.
To your future and continued success,
~Aaron
Program Updates
This program has taken on a life of its own since its inception in 2015 — and it puts a smile on my face everytime I hear a testimonial. You enthusiasm to uphold your own strength and health keeps me going.
As time goes on, I find myself more experienced and more knowledgeable. While the core principles of progression and habit still exist, I still find myself making changes. As I do so, I’ll note the major changes here.
8/29/2020 -Removed Half Pistol Squats (previously step 6) from the Squat Progressions. I find that all people who can manage a bulgarian squat breezed through this progression. You can go directly into assited pistol squats.
55 replies on “Progressive Bodyweight Workout – “The PBW” Calisthenics System”
Hello, congrat for you’r job its a very good program. I have one question. This program is not umbalance (pushing/pulling) on the week we have more pushing movement than pulling movement in the week. Tanks for your awnser.
Ps: sorry for my english i hope you undestand my question
Is not umbalance ? *
I’ve thought about this too. In order to reduce fatigue for newcomers, I took out pulling motions from Workout B.
In a rework, I’d likely add some light pulling motions.
If you want to add pull-ups/chin-ups or front lever rows to Workout B, then I wouldn’t stop you.
Hi, thanks so much, I love the program. One question though, when you do the plank, should I do 4 x 60 sec ?
Great page, guy. Keep preaching ya truth.
Hi, this is great. My husband and I are travelling around Australia in a caravan soon and have been looking for a good workout we can do anywhere…. but there will be stretches where we will no ability to find anything similar to a pullup bar, there will be no trees, no parks or anything similar. Is there any alternative to do these days as a worst case scenario.
Creativity with gym rings or a suspension trainer would be your best bet. If your car/van/mode of transport has a way to lash rings or anything off of, you could do pullups and your leg raises off of that.
In circumstances where you are (literally) out in the middle of nowhere and cannot even get that, find an object similar to a table (parallel to ground, stable) for inverted rows. You’ll likely smash past 4×8 – just aim for reps in these circumstances and really focus on feeling the back. You can make this progressive by gradually lessening your feet’s pressure on the ground until you’re essentially not touching the ground. There’s a bit of a feel-out for this process.
That exercise translates almost directly into developing a front lever – though I am always very wary of front levering on a table that isn’t being counterbalanced by a person on the other end. Great tutorials for this exercise exist elsewhere – until I find the time to make my own.
You can also try partner rows . Measuring progression for this is difficult, naturally… But as long as you’re doing more than you did before, you’re probably progressing. And rowing is better than not rowing. 😉
thats great- thankyou so much for responding. Will post a reply when we return with our progress!
Can’t I do Workout A and B on the same day for 3 days a week since it seems more effective?
As long as you’re progressing (that is – you are getting closer to the hallmark movements), then do whatever feels best.
The ultimate goal is progression. The PBW is simply one way to do this in a measured, intelligent way; it’s the antithesis to unmeasured, unintelligent, random training.
Great routine. My only problem is leg raises… cant find proper chairs to use.
Yeah, this was a sticking point for me regarding inclusion. Two options:
1) You may be able to replace them with V-Ups (going up to 5×10 straight legged) before jumping into bar based work.Anything you can hold as a parallel bar will work. This is something I’ve thought about for a PBW V2.
2) Could be worthwhile to grab a dip bar set – this can prove useful for adding dips and parallel bar-style work to your growing calsithenics routine.
Hey Aaron, thanks for this site.
Could you share your thoughts on dips? I see them being recommended on many other sites. Are pushups and handstand pushups enough for tricep development?
I’m a huge fan of dips – for both muscular development of the triceps AND training the pushdown motor pattern. That’s used in things like climb-ups and anything requiring you to support your weight vertically. Very practical movement.
I didn’t inlude them in the PBW because I wanted to focus on movements that didn’t require equipment/weights to increase resistance. Dips are limited – after you can do parallel dips, you can only a) add reps or b) add weight to make them harder. In a “PBW+”, I’d probably emphasize dips.
To answer your question on tricep development – the pushup progressions, when done with controlled eccentrics, are enough for what many people use this system for – to generate new bodyweight skills, make a habit out of fitness, and have a functional workout foundation that they can do anywhere. You could either supplement pushups with dips (on the same or alternating days), OR you could replace pushups with weighted dips.
When it comes to one-handed or one-leg variations. Should we do 2 sets for each side which give us a total of 4 sets or should we do 4sets for each side?
You’ll want to do 4 sets per leg. This pattern is true for all unilateral exercises (e.g. one armed pushups, one-armed pullups).
Would a different split work such as an upper body (push-up, pull-up, handstand) and lower body (squat, leg raise, plank) split.
I prefer the current mechanism – it’s somewhere inbetween a fully body workout and a split. But I believe that you should try whatever you feel is easier to create as a habit. If you plateau, then you can switch to the prescribed program.
How do you know what step to start each exercise? Does everyone have to start from step 1 for every exercise? Is there an assessment process?
Well, when I started it, I just tried to guess which level fit my fitness level best.
Of course, I was wrong in some exercises:
If you can’t do 4×4 reps, move one level down until you can.
If you can do 4×8 reps, move up one level until you can not.
Btw, very nice training Aaron!
Thanks a lot for all your effort, I really appreciate the visualizations for each progression level :).
My pleasure. I’m glad you’re getting how the progressions work and that you’re grasping the primary principle: fitness is about discrete progression and context.
What Tobias said is what I’d recommend. Try each progression level until there is one you are shakier at. Feel free to start where you think you are – and let your results guide your starting point.
Do you add more blogposts in future?
I really like them!
Anita
It’s hard to find the time to write and research. But, potentially. I do like all the thank you emails (keep ’em rolling people) 😀
Hey Aaron it’s me again 🙂
Sorry for asking so many questions but you really inspire me. Since I found your website (while searching some strength exercises for pole dance lol), I read a lot about those calisthenics thing. I’m totally impressed what people can do. Especially some women with handstand press skills. I’m going crazy about that, I want that too 🙂 yes I’m realistic, long way to go. But first I will achieve my first pull up!
So…my question: In my hype a searched for some programs/apps that contain progressive exercises to reach a lot of intermediate and advanced calistheincs moves. I found calisteniapp and movement athlete. Both wirh progressive exercises, but all have some 3×30 reps goals (saw this on most programs). So I think I will never reach 3×30 pullup and I don’t want to. Do you think it’s ok to set my goal to 4×8 for each progression like you recommend?
Cheers Anita
Hey Anita, I totally missed this comment last year. Sorry about that!
You 100% can (and SHOULD) set your progressions closer to 4×8. If the primary goal is strength, then a lower rep range will do wonders for your rep quality and recovery.
That said, there are sometimes reasons why hi-rep (15+) ranges are good. After your primary strength training (4×8), you can do a set or two of some easier exercises to get their benefits. A list of pros for hi-reps below:
1) Hi-reps with low-impact = better joint health. Connective tissue has poor vascularization and must receive nutrients through interstitial fluid via diffusion. It’s like a sponge: squeezing a sponge then submerging it will fill it with new water faster than sumberging a sponge that already has its fill of liquid. That new water is like your blood — rife with nutrients — that your joints will appreciate. Quality repetitions under a low-to-lowmedium load are great for this.
2) Muscular endurance. If a goal is to be able to do more, then naturally, the best way to train is to do more! If this is a goal. then train until you feel “the burn”, and then train a little bit more! Lactic acid and other metabolites created during workout will make you feel that characteristic soreness. You’ll know lactic acid burn because it seems to quickly dissipate intraworkout after you’ve stopped your set. Exposing your body to that lactic acid can effect physiological adaptations that allow you to utilize it (yes, really! See this NY Times article) and psychologically tolerate it. More reps = more endurance = more energy and movement.
3) Convenience. Let’s say your goal is still strength and muscle tone. Unfortunately, not all bodyweight exercises have clear cut progressions that are easy to remember off-hand. But, when it doubt, you can just do tons of reps of the exercises you do know! Train until your reps start to get effortful. This is where the magic happens — as soon as your max effort rep slows down because of mechanical fatigue, that’s where your greatest physiological adaption will occur.
Some people will train to failure as it is very easy to know when you’ve worked out hard enough. But if you don’t recover well from this (like me these days), then a good rule of thumb is that you train a 15+ rep set until one or two of the reps are “slower” (e.g. takes more than 1.5-2 seconds to complete at nearly maximum effort). That’s your cue to take a break, because you are now taxing your muscular endurance system more than your strength system.
This is a long winded way of saying that 4×8 is a-ok for your goals. Best of luck and skill, Anita!
Thanks so much for taking the time to put this together, I’ve just started, so I’m looking forward to seeing it through! I do have one problem though: when it comes to the wall handstand pushup, I tried starting from the pike press in the progression, but I’m really struggling with it – not because I don’t have the strength, but because I can’t actually get into that position and keep my legs straight, my leg muscles are way too tight! I’m working on my flexibility, but in the meantime is it okay to bend my knees a bit during the exercise, or is there an alternative I could be doing? The inclined pike press is a bit too easy.
Also just while I’m commenting, I want to make sure I’m reading the plan properly – is it only supposed to be one 60 second plank, not four sets?
Cheers!
Hey Steve,
Sorry for the late reply. I think it’s fine to bend your legs during the Wall Handstand Push-up as long as your spine and hips feel all right with it (e.g. they’re relatively neutral and there is no pain).
It’s worth noting that working on straight leg mobility should be paramount on your list of things to-do. It may be as simple as simply raising your legs to the front, sides, and back as high as you can without pinching, holding it, then slowly lowering them back down. Just like the rest of these exercises, you can do that in reps. Feel free to do this pre (or post) workout.
You are correct. The planks only last 60 seconds because there are large dimishing returns on them. The goal of planks are mostly to help you learn breathing patterns while your core is braced. This has incredible crossover with almost every exercise in existence, because breathing while under tension (or assymmetrically, in the case of plank marches and simple limbed planks) is associated with EVERY EXERCISE! I could write an article (or a book even) about active and resting breathing patternsfor health. But the summary is this: planks teach you how to breathe deep while bracing your core, and this is useful for almost everything you do athletically that requires effort.
I do push-ups sit ups and planking 3 sets each day. I also use amino acid supplements for better results.
Hi, Aaron. I have just completed 4th exercise day.
Why not do Pull-ups on Workout A days and Chin-ups on Workout B days, instead of switching between them on Workout A days?
Thanks for the great content.
There are a few reasons, but to be frank, I’ve gone back and forth on the “optimal” amount of back volume. When I first made the PBW, I thought that maybe the volume would be too strenuous for new trainees or people getting back into strength training — the primary audience for the program.
This is especially true with single-joint exercises like one-armed pull/chin-ups. Calisthenics practitioners tend to get elbow tendonitis due to this. I was programming more conservatively by reducing volume.
If your body can handle it and you don’t have nerve-style pain (sharp, stabby pains), then feel free to do pulls on all workout days. Pull/chin-ups are an exercise that respond VERY well to higher volume training. This tendency will be reflected in an upcoming PBW V2 for intermediate/fast-track trainees.
Hi, Aaron. I’ve been doing your workout and so far it’s been great.
I just reached pistol squats but I’m having issues with my left leg. I can do it perfectly fine with my right one, but with my left leg it feels really awkward. I feel as if I’m not stable enough and as if I was gonna tip backwards. I feel as if I wasn’t flexible enough and I end up in a really awkward position. Also, I feel my leg working only near my knee instead of the whole leg like I feel it on my right leg, and that causes a bit of discomfort on my knee.
What would you suggest I should do?
Thanks for the great routine!
Hey Alvaro. Excellent job making it to the pistol squat progression!
There are a lot of factors at play during pistol squats, so it can be difficult to discern what specifically is the issue. If I hear a person isn’t “feeling” the muscles working — which often manifests as compensation using the knee’s passive structural integrity — then my first step is to look at 1) hip mobility and 2) general single-leg strength
For #1: Look into the work of Dr. Andreo Spina. I’m imagining that your abductors need a little mind-muscle connection — slow, controlled hip mobility-focused exercises will give you greater control and muscle tone at your weakest points. Watch some videos on Hip CARs (Controlled Articular Rotations), the 90/90 Hip Stretch, and this hip sequence. The Hip CARs will tell you if your hip is the culprit, and the other two exercises sequences are for remediating/improving hip mobility. I am especially fond of Spina’s hip sequence
I am also fond of deep squatting. Take a look at Dr. Spina’s squat position in the earlier hip sequence video. Try to work in a full 3 mins of deep squatting, really focusing on feeling/slightly flexing the mirrored muscles on your left leg that you are having difficulty feeling. Try to imagine your right leg’s level of flexing, except mirrored. I know, it’s tough.
For #2: If an earlier progression on your left leg allowed you to feel the correct muscles, then try to work extra volume there. Aim for higher reps (12-15+), to really build that mind-muscle connection. Then each week, after a warm-up set, try one rep to see if you’re better able to feel it. If you know which body part is lagging behind (glutes, quad, hip, hamstring, or other), then I’d grab an exercise or two that more specifically isolates it. Do a few sets of it a higher rep range (12-15+) post-workout.
In complex movement, we are only as strong as our weakest link… and Pistols are definitely a complex. Diligence in mobilizing and strengthening our weakest structures will give us our full body power.
Best of luck, and careful. Take it slow and easy, and never force yourself through joint-related pain if you feel it. When it doubt, see your local physical therapist!
Thank you for the tips Aaron!
I checked the hip mobility exercises out and I figured the culprit are not my hips but my ankle. My right ankle can flex pretty well, but my left ankle doesn’t. My left heel raises slightly when performing the squats, making me unstable, unable to reach a full squat and also puts more stress on my knee. It makes sense because some time ago I sprained my ankle and never did any rehab exercises :/
Do you recommend any exercises for ankle mobility?
Thank you again for your amazing routine!
Ankle dorsoflexion was the next thing to check.
1) Check out this 3-way ankle dorsoflexion video. Don’t go overboard though – mobility is all about going just a little deep, but not too deep so you pull something. If there is non-muscular pain, stop.
2) If you can sit in a deep squat (at this point, I imagine you can), do so. Then, lean forward a tiny bit on both ankles, keeping the heels down, then lean in and out of the flexed ankle position. Like #1 above, try to accumulate 3 mins of squatting, with 1 min being that lean forward. Gradually increase the proportion and time as comfortable.
If all else fails, see a physical therapist. In-person assessment is a gold standard. Best of luck!
Hi.
Came here pretty much by chance and read by curiosity. Really love how the articles are written: full of common sense, yet without any presumption. My only change (as it was noted by other) would be to add an horizontal pulling movement (any rowing progressions).
I do have a question though: I am currently training for marathon. I run 4 times a week, and my typical week is:
Tuesday: Light run + Tempo Run (2-3 x 10′)
Thursday: Ligth Run
Saturday: Light run + hills (10-15x 45″)
Sunday: Long Run (1h30-2h15). Include “race pace” phases
All sessions are approximately 1 hour long (expect the long run)
On my day off, I do some upper body & abs workout (2-3 days per week). It always includes 2 pulling & pressing movement (horizontal & vertical). Most are bodyweight exerices (sometime weighted), but I include some dumbells works (lateral raises, shoulder press) from time to time.
However, I cannot find a way to include at LEAST 1 lower body workout during the week.
What would you suggest? Am I fighting a losing battle? My purpose is to avoid losing muscle / strength that i gained during the “off” season.
Extra horizontal rowing would be great, and I do supplement my own training with front levers when I have access to a gym/stable table. I stand by thinking this program is relatively balanced as a base – and adding any extra that you know you can maintain is gravy, so I support your decision.
As for your question on programming, I’m going to paraphrase here. You currently have:
1. Upper body strength training – moderate load
2. Low/medium intensity steady state – moderate load
3. Two seasons – an on-season where you are lifting with your upper body and running a reasonable amount, and an off-season where you are (I’m assuming) lifting with your upper body and running a little bit.
I will say that you are NOT fighting a losing battle. Plenty of long-distance runners include a minimum of strength training because it can A) increase power per stride and B) supplement the resilience of their joints/muscle for running. It’s just a matter of getting in ONLY the strenuous exercises you will need (e.g. maybe ONLY squats and a couple sets of accessory work), ensuring you get enough food (e.g. enough protein to recover, enough calories to be relatively at-maintenance with your total caloric expenditure), and resting/keeping your stress levels down intraday so your body continues to repair. Recovery must outpace tissue destruction. This is where gains will occur. And finding that point is up to you.
Slowly integrate a set or two of lower body movements before your runs on on-season. And on off-season, I wager you could fit in an entire lower body workout.
Week 1:
– 2 sets of primary lower body strength before runs. 1-2 sets of any accessory lower body movements (optional). Focus on both force and power (aka, amount and speed)
– Eat a little more than normal. Estimate a couple hundred calories, ideally a little extra protein (20-30g). Hard to tell without exact body measurements, but feel it out.
Week 2:
– 3 sets of lower body strength before runs. 1-2 sets of any accessory lower body movements.
– Eat the same as before if you were recovering well. Eat more and rest more if you were not.
And repeat. The goal is to optimize quality reps of a primary lower body movement before your runs (aka, before you’re entirely exhausted), to get a little extra to eat, and a little extra attention to recovery and how your body feels. When you’ve noticed a trend of degrading performance in lower body, you either dial back workout volume AND/OR you eat/rest more. I leave the proportions up to you for now. Experiment, feel, and adapt as necessary.
Hello Roam from Paris, France
Just thank you your routine here is just perfect, and your kindness is great.
Your must be a great man.
Thank’s
Bye
Thank you Fernandez. Keep up that discipline. 💪
Hello, i`m on this for a month, just added pulling motion on B, and a bit of legs. Thank you allot, i even put put my wife and kids, and all love it.
What is your opinion on dips, and should they be done on same day with push ups, or pikes, or maybe adding a C workout with dips only?
I’m really glad that your family can bond over strength and health. Thank you for sharing bout how it’s been helping you out, Ivan!
I think that bench dips are somewhat a waste of time. I think that parallel dips (such at these weighted dips from many moons ago are a fantastic exercise that allow you to add weight/challenge your body more easily than push-ups and are less threatening than sitting under a bench press without a spotter.
As for putting it into your routine… Introducing a couple sets (or more) of dips into A or B days won’t hurt. Place them before your push-up progression (if you want to emphasize dip improvement) or place them near the end of your workout (if you want to emphasize push-up improvement). Just be wary, and listen your body. If it’s feeling extra cranky and not recovering as well as it was before, then dial back the volume. If you have enough accessory/alternative exercises you’d like to add, then it could be worth adding a C day. Just make sure that you’re getting enough training volume — that your C workout has as much exercise as the A/B workouts.
Hi,
How do you handle soreness? Does being too sore mean you need to go back a progression? This has happened for both workouts for me, the squats one and the pull one. I haven’t had a good rhythm working out because after the squats, the day if I was fine, but for 3-4 days after I could barely sit down. After the pull day I couldn’t even reach for a glass of water, so I ended up skipping working out for another 3-4 days 😭
I’m not sure what to expect or what is a reasonable amount of soreness but it’s kind of terrifying to do the workouts again…
Hey Emily,
Being too sore days after workout is called “DOMS” (Delayed Onset Muscle Soreness). For many, it is a right of passage into strength training for it to occur a few times. Thankfully, this gets much better as your body develops and recognizes the demands that training brings upon it. In the interim, there are a few things you can do to reduce DOMS:
Rest assured, you are totally normal. 😉 Keep training, even if it’s just a little bit less! And don’t forget to eat!
Thank you for all this! Will give a try!
Hey, I’ve been adhering to this plan for about a month now and I definitely feel stronger and fitter, my question is, you say work out for 60 minutes each time but how does doing 4x (however many possible at the time) of 3 different exercises and a 60s plank take up 60 minutes or am I missing something?
Hey Bobby,
You’re right: most will finish the base workout in less than 45 minutes. My numbers were very conservative when writing this so I wouldn’t feel like I was baiting and switching. That said, there are 2 reasons why I kept the minutes high:
1) Post or pre workout extras. Some (like myself) may elect to do some cardio, mobility drills, stretching, etc. and part of me felt disingenuous if I lowered the number.
2) Occasional recommendation of longer rest periods (3 to 5 minutes) for those who are plateauing. Powerlifting science demonstrates that it can take up to 5min rest periods to allow full phosphagen (ATP) restoration after a set, which is one performance tweak that you might want to try for maximal force production. Higher quality expression of strength = greater potential for progression.
Here’s my napkin math for how long it may take:
[sets * exercises * minutes for rest and set – minutes for inbetween exercises 1-to-2 and 2-to-3]
4 * 3 * 4 – (4*2) = 40 mins
4 * 3 * 5 – (5*2) = 50 mins
4 * 3 * 6 – (6*2) = 60 mins
I am glad to hear this is working our for you — and that it is apparently even easier to progress than you anticipated. Part of me writing this system was to prove that meaningful fitness habits could be achieved efficienctly and quickly if the right principles are followed. Thank you for using the program.
Thanks a lot for getting back to me, I see what you mean now, I was starting to get a little disheartened as I felt like I was plateauing as you said, but I left 5 minutes in between exercises and noticed a HUGE difference, so thanks again for the advice. I’d also like to say, it’s really good to see someone showing that being fit and building muscle doesn’t have to involve a complete life devotion, a fortune on supplements and gym memberships and body crushing 3 hour workouts. I have attempted before now to get fitter and stronger but was always put off by people that when I ask them about their workouts, am being told they’re benching ridiculous weights all for bravado rather than admit that it can be done efficiently, effectively and alongside a busy lifestyle so and felt like it wasn’t worth doing as I could get nowhere near what they said they were doing so, again, thanks hombre!
Thanks Bobby. I think people like you are all I can hope for. Keep on training, and spread the word. The more we have fighting back against the lie of the fitness machine, the better off we’ll all be.
Here’s hoping. I did forget to ask though, what’s your diet like? I mean, what do you eat on a daily basis?
It looks something like the below:
0) I don’t normally eat breakfast, and will break my fast around 11AM-12PM. I generally stop eating after 8PM or 9PM.
1) At least 100g of protein each day (sometimes more, sometimes less).
2) I have a stack of supplements: Calcium/Magnesium/Zing, Vitamin D, and a general multivitamin that changes every so often. If you’re looking deeper into micronutrition, look into Dr. Rhonda Patrick’s advice. She breaks micronutrition down into very useful principles.
3) Otherwise, I let the general fluctuation of hunger/non-hunger carry me the rest of the way. I usually consume about 150-400g carb and 40-60g fat in a typical day. My sources are very varied. I eat bread, noodles, rice, potatoes, ice cream, random sugary treats, etc. for carb sources. For fat, I mostly eat whatever oils or butter I end up using (.5-1tbsp per 1lb of meat I’d say) in whatever meats and veggies I cook, OR whatever fats come incidentally from snackfoods and eating out (or, in this Coronavirus era, eating in).
In summary, I practice what I preach on the Nomad Diet page — except I also track (almost) every calorie I eat in MyFitnessPal. I give myself leniancy on sugars/incidental eating as long as I meet certain macros.
Hello,
Currently, I’m having more frequent meals with lots of calories and protein, but I was wondering if this workout is effective for building muscle as a skinny hardgainer.
Hey Matt. In a nutshell, yes. My body type tends to hold little muscle mass — it was through study, experience, and acquired self-knowledge that I pushed past my own bodybuilding plateaus. As long as you are doing the progression that tests you (aka, you strive to do 4 sets of exercises that are harder than 4×8) and continue recovering via diet and rest, you will see results.
Hey man,
You say that the number of reps we should aim is 4×4-10, but in your schedule it’s written 4×4-8.
It’s probably a typo but still ask to make sure which one is correct.
4×8 is correct. I did a bad find+replace on that post. Thank you!
Thanks, good thing I asked ! ^^